Laman

Sunday, November 29, 2015

Movember Cake Pops: Melting Chocolate

Oh, chocolate, chocolate, chocolate...
You've probably read that with the wrong tone. It was an oh, not an ah.
Now picture me shaking my head wearily and saying it.
Yes, that's right - that kind of tone.
(Sometimes dealing with chocolate is like dealing with your children at the end of a looong day.)
And if you've battled with cake pops, it's either that your mixture is wrong, or the chocolate is being bratty.
(Find how I make my cake pops mixture here.)

So, here's a chocolate tip for you:
It's really easy (too easy!) to over-heat chocolate.
Chocolate starts melting around 30-32'C. Once it's melted the temp. is around 40 - 45'C, depending on whether it's dark, milk or white chocolate
But it should not get to temperatures above 46'C (48'C for dark chocolate.)
So... you have a degree or two leeway. Eek!! 
If you've overheated your chocolate, it looks kind-of melted, but instead of  pouring freely off the spoon if kind-of plops of the spoon  ... in a different kind of way to un-melted chocolate! It's preparing itself to seize.  (Chocolate's version of a kiddie's temper tantrum). You may in fact think that it's not melted enough, and continue to heat it. Bad idea! If you recognise that it's getting to the over-heated stage, immediately remove from the heat source and stand the bowl containing the chocolate in a larger bowl of cold water. (Don't let any of the water get into the chocolate, it will seize!) Stir until the chocolate begins to cool down. You may rescue it.

This is what melted chocolate should look like for dipping cake pops:


(Music credit - Falling by Julee Cruise)


And this is what overheated chocolate looks like - note how it appears lumpy; don't confuse this with under-melted chocolate!


(Music credit - Fix You by Coldplay)

I hope that helps! 


Happy (end of!) Movember ;o) 

xxM 

Friday, November 27, 2015

DIY Fashion // How to Make Boot Tassels


 The second shoe dress-up DIY this week [before the Christmas madness!] is perfect for adding a bit of colour and detail to your boots - tassels!  I love a tassel, I have made many a version [here, here and here] and this is another way to create mini versions that can easily be added and removed/replaced.
It's also cheap - winner.


To start, I cut my cord in two and then with one of the 1m lengths cut in half again [in to 2 pieces].  I then cut each of these in to halves [now having 4 pieces] and then cut each of the 4 pieces in half [a total of 8 piece]. Set one piece aside and to the remaining seven pieces, cut them in half once more [a total of 14 pieces and 1 longer length]:

Lining the 6 pieces of equal length cord together, I secured them in place at one end with a finding, using jewellery pliers to open the finding as wide as possible, before clamping closed:
[it was a tight fit - but as long as you are sure the cord wont be able to fall out - you don't need to worry about it looking pretty!]

Once secure, the longer length of cord is used to act as both a hook and to cover the finding.  
To start, use strong glue, fabric glue [or a glue gun, in my case] or sew in to place one end of the cord to the top of the finding.
 Create a small loop and fasten in place where the cord crosses to secure in place.
Now, tightly wrap this around the finding and twice again to cover the tops of the tassel:


Glue the end in place to secure and neaten then trim the ends to the same length:

...and your tassel is complete.  
Do the same with the second 1m length of cord and you are ready to dress up your Winter boots:

Add your second set of findings to the loops to make them easily fastened to zips, loops and buckles:
Create them in different colours, textures and sizes for a easy and budget-friendly way to dress
 up your shoes:
Of course, these aren't just for boots - add them to strappy shoes for a bit of glam, or use them as key rings!  see you next week for the launch of something special x

Monday, November 23, 2015

CLAY BUNGA

 Clay Bunga 2
 Isi 12biji
 Harga : Rp 21.000,-

  Clay Bunga 1
 Isi 12biji
 Harga : Rp 18.000,-

 Clay Bouquet
 Isi 12biji
 Harga : Rp 13.000,-


 Clay Mawar warna
 Isi 12biji
 Harga : Rp 18.500,-


 Clay hitam putih
 Isi 12biji
 Harga : Rp 15.000,-


 Clay rose putih
 Isi 6biji
 Harga : Rp 15.000,-


 Clay rose pink
 Isi 6biji
 Harga : Rp 15.000,-


Clay Bunga 3
 Isi 12biji
 Harga : Rp 21.000,-


 Clay mawar motif
 Isi 12biji
 Harga : Rp 20.000,-


Clay mawar besar
 Isi 12biji
 Harga : Rp 12.000,-

Clay mawar kecil
 Isi 12biji
 Harga : Rp 10.000,-


DIY Fashion // How To Make Lace Up Flats


If you're an instagram fan, you wont have failed to notice the beautiful lace up flat pumps starring in almost every fashion account and versions starting to make their way in to stores.  I'm in love and they were calling out for a DIY alternative.  They were much quicker to make than expected - you can have your own lovely pair made in a hour - and there are really only two steps to the project.
My kind of DIY.


These DIY flats can be as budget-friendly as you like.  I picked up a pair of pointed mock-suede flats from 'George' at Asda, which cost £8, and the trimmings: leatherette cord and 1m of black ribbon from 'HobbyCraft, costing £4 altogether.

To start, you need to create your loops.  The number you create will determine the number criss-crosses over the foot when the shoes are laced up.  I wanted a simple version, with one main criss-cross at the front, with the ties looped around the ankles.

For this, you'll need one loop at the front, two either side at the front, two either side at the ankle, and one at the back: 6 in total.  Create these with your ribbon - I cut 12 2-inch lengths:


Fold each ribbon length in half and then pin in place to ensure the distance between loops is as wanted.  Allow at least 0.5cm to sit from the top to ensure your cord will thread through:


Once happy with the placement of your loops, it's time to sew in place.  Use thread of the same colour and make small running stitches to secure the loops at the top of the shoes:


Once happy, knot and cut your thread and then trim the left over ribbon.
To neaten the edge and ensure no fraying, run fabric glue across the cut edges and leave to dry:


Once your loops are in place - it's time to lace up!


I chose a leatherette cord for my laces and bought 4m in length.  Cut in half and start lacing through the front loop to start - follow each end to the front side loops then cross over, threading through the ankle loops - continue round to the back, where the ties will cross again as they loop through:


I'm really pleased with the finished look and these are a fab addition to my collection of flats - I'll be making more in other colours and these could be a great gift idea for the fashionista in your life!


see you for another DIY Autumn/Winter footwear update soon x


* Some of the links in this blog post are affiliate links - you can read more about this here

Saturday, November 21, 2015

Cold Weather and Cocktails

A lot of things have happened since my last post, with the most significant being that I landed my first full time job! I now work in a department store, and while much of the usual retail/customer drama comes into play, I'm actually rather enjoying myself, and I work with some really great people. Is it what I initially envisaged for myself? Absolutely not. But I'm one for trying to make the best out of whatever it is I'm dealing with, and that's certainly the case here. Besides, it's good to try things you wouldn't normally, as they might lead you to the dream. That's what I tell myself anyway!

It feels a little surreal at times to be dressed in a smart blazer and work trousers, like I'm wearing a disguise. I don't wear lolita nearly as much as I used to because I'm at work 5 days a week, but somehow I feel as though my appreciation for my clothing has grown. Putting together a coordinate, no matter how simple, always feels like "coming home". The warm, comforting familiarity of it is wonderful. On the flip side, it's been somehow nice to be pushed out of my comfort zone and try a completely different look. One thing I've always been wary of is becoming too reliant on lolita fashion to the extent that my personal style completely stagnates, and if faced with the prospect of wearing something different I'd be screwed. I'm relieved to say that I am more than capable of coordinating clothes regardless of whether they're alternative or not!

I was born and raised in England, so naturally, I enjoy talking about the weather. It's been getting colder recently, and it's quite a shock to the system after what has been a really warm year. Trees are looking very bare, and the town centre is already in a mad rush as the Christmas shopping season is well under way. The days are short, with darkness taking hold of the sky by mid afternoon. I have always hated November for its cold, stark oppressiveness but this year I feel completely different. In the past I have suffered quite badly from seasonal affective disorder, particularly during this month, but I have been largely unaffected by it this time around. It could be down to multiple factors, of course, like the fact I'm no longer in education (it still feels SO good to be able to say that), am working full time, and am more active than I used to be. Whatever the reason, I am really thankful, because I'm appreciating this month in a way I was never able to beforehand. OK, so I'm really behind on my Christmas shopping (well, err, I've not started it), I've not done any sewing in weeks and weeks, and I've largely been neglecting other domestic duties (I've been meaning to take a bag of old clothes to the charity shop for literal months at this point). But I feel happier, more purposeful, and financial stability has blown away a lot of storm clouds from my mind. Fore now at least, things are swell.

❤      

Recently, I met up with my best friends for the first time in far too long, and we had a really lovely day out. The weather was abysmal, and yet we couldn't have been in better spirits. We had burgers at the pub, before heading to a bar for cocktails. My umbrella got obliterated, our hair got rained on, and we were blown about in all different directions, but I look back on that day with such fondness.

OK, so I don't look with fondness on the moment when a gust of wind so strong it completely ruined my favourite umbrella came along. I hit poor James in the face by accident with it, and he still obliged to hold the broken remains so I could take a picture. Thanks, James.

The first stop on our day out was the crafts boutique I used to work in, where my brand's items are stocked. There was a store party happening, with drinks and snacks for everyone.

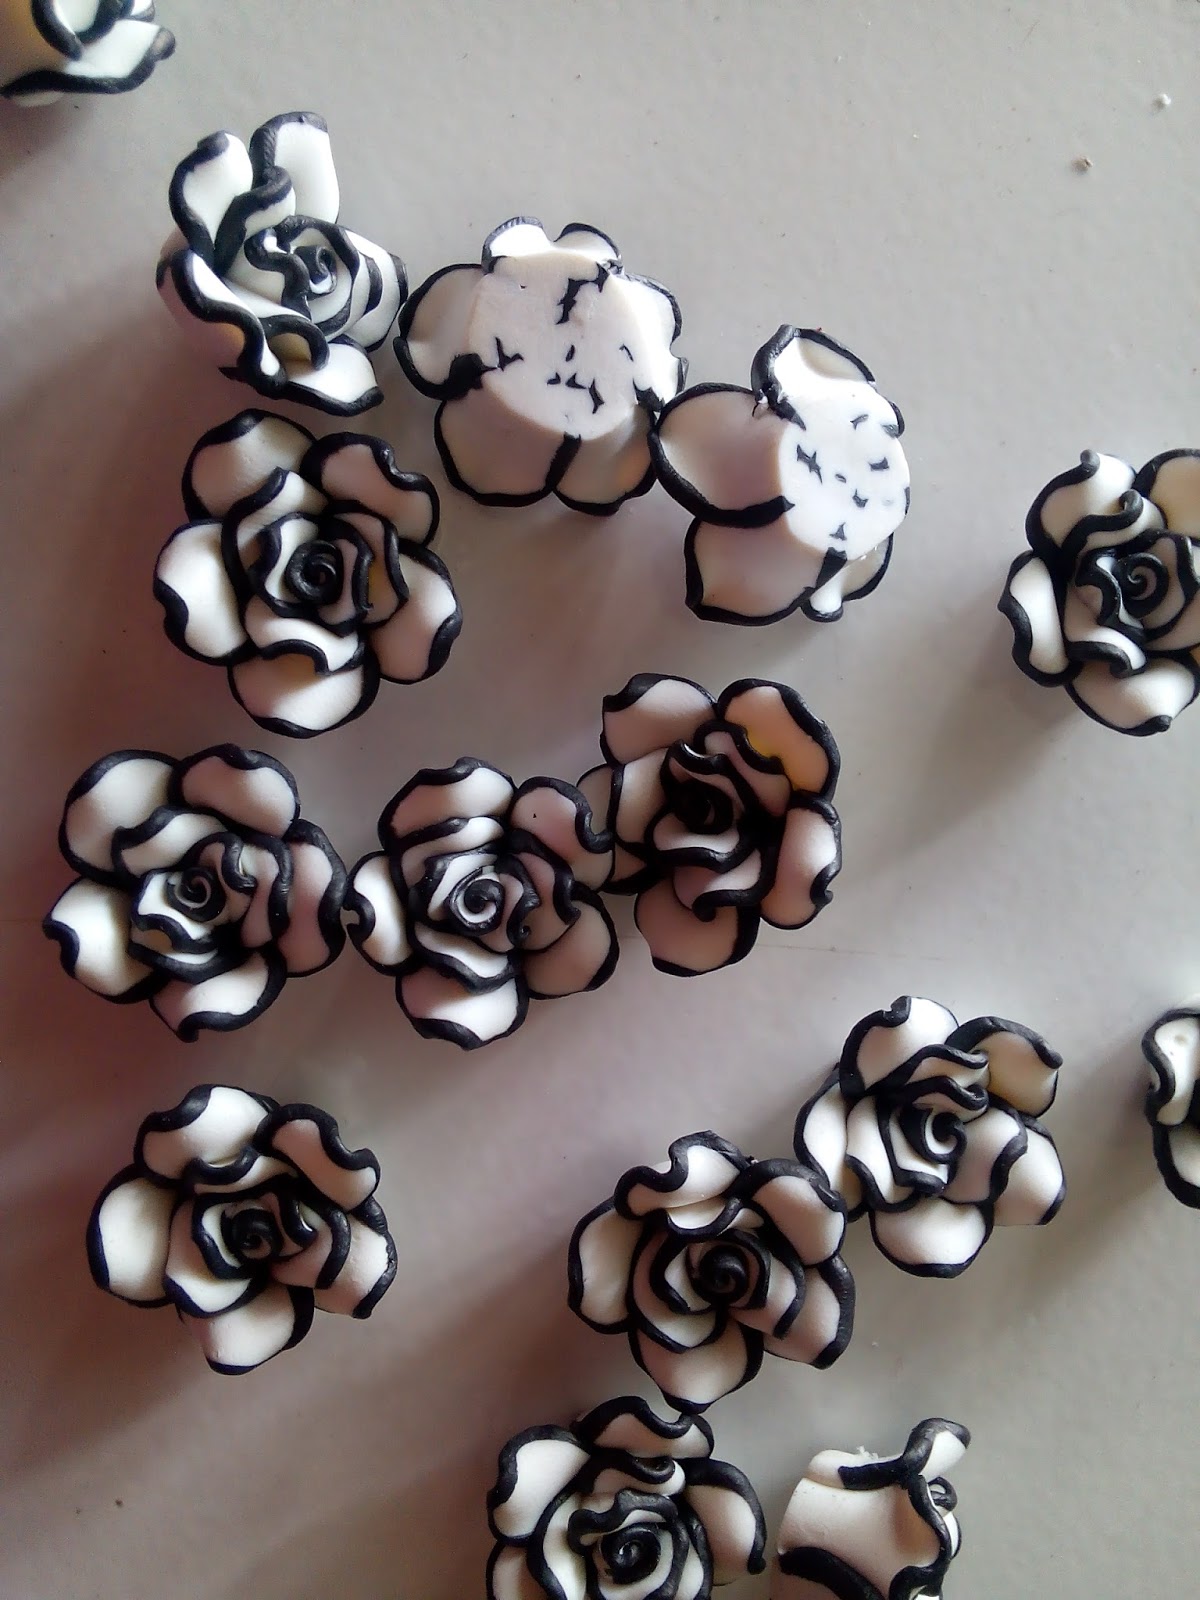
 My current selection of stock! Gosh, I miss sewing. I want to make some cute, simple skirts next.

After this pit stop, we headed to the pub for food. I had a pulled pork burger which was an absolute mess to eat. It was tasty, but I could have done without the apple sauce, which made the bun disintegrate into a mushy mess. I was so full from it that I couldn't even finish my chips.

After food, it was time for a group photo. We were seated by windows overlooking the River Kennet. It was quite the picturesque affair.

Because the weather was so bad, I didn't feel like wearing any pale colours, and opted for a simple coordinate with my go-to old school jumperskirt.
I really liked how this outfit turned out, and I definitely need some more black and white items in my life.

After we were done eating, we made the huge mistake of ordering a pitcher of cocktail called strawberry woo woo. It was a disgrace-- some disgusting syrupy concoction without even a hint of alcohol, and watered down even more with an excessive amount of ice. I did enjoy the process of ordering it, though, as we were served by an Australian bartender who seemed completely uninterested in formalities like actually checking our ID (unheard of here, where you get ID'd for absolutely everything). He merely waved a dismissive, jovial hand at our poised ID cards and said "are you guys all eighteen? Cool, well you all look the part so it's fine." What a shame our resultant order was a complete and utter waste of money. But fear not, for we decided this simply meant we needed to head to a different venue. So we did.

The Purple Turtle is one of my favourite venues aesthetically-speaking, done up in (of course) purple, with lots of posters of bands and musicians, drum kits for lampshades, and novelty seating. Take a virtual tour here, and don't forget to go downstairs. I've never been there late at night because I'm not really a clubbing/"let's get drunk" sort of person, but it's a super chill place to be early in the evening, and they play music I tend to like, which on this occasion was some old school Suede.

After being excessively ID'd by a member of staff (she couldn't believe Luna was 27) we got ourselves a round of cocktails as there was a 2-for-1 offer. Sammi and I had a Love Potion 69, and boy was it delicious, and something I need to have again as soon as possible. We had a leftover Sex on the Beach as James didn't want a cocktail, so three of us decided to act like it was a "fishbowl" for reasons best unknown.

We ended our day by having all manner of conversations, and contemplating going to a show happening at the bar later in the month, described on the leaflet on our table as "boobs, bottoms, belly-dancing and burlesque." Well, that sold it to us.

I really enjoying hanging out with these guys and I'm already looking forward to our next adventure, whatever that may be! Thank you so much for looking and reading, and do let me know what you've all been up to during November. See you next time 

Friday, November 20, 2015

Russian Teacakes / Pecan Shortbread Cookies

It's time to start buying some jars. What jars? The ones you're going to fill with delicious treats for your kids' teachers end-of-year gifts, of course... you being the craftsy baker that you are!  ;o)

I recently bought some perfect gift jars (c/o the local Mr P). And then went back and bought more, because I wanted  needed to keep the first lot for myself. I'm sure I'll need them for something. Sometime.

Anywaaay... here's an idea for jar-fillers:
These  cookies are known as Russian Teacakes, or Mexican Wedding Cakes, or Snowballs.
None of which really work to describe these delicious, melt in your mouth, nutty, shortbready biscuits covered in mounds of icing sugar (hence the term snowball!).
They're very easy to make - especially if you use a food processor to chop the nuts. In fact, use a food processor for the whole recipe!
Here's how...


Russian Tea Cakes/ Pecan Cookies

Ingredients:
180g pecan nuts
250g butter, at room temperature (that's important)
320g cake flour, sifted
70g icing sugar, sifted
1/2 tsp salt
1 tbs vanilla extract

Plus extra icing sugar for dusting.


Method:

Chop the pecan nuts into small pieces using a food processor. Remove one third of the nuts*, and continue to process the rest until finely ground and almost paste-like.
Add in the butter, flour, 70g of icing sugar, salt and vanilla. Pulse until mixed. Then mix in the remaining finely chopped nuts* (doing this gives the cookies some extra pecan-nutty texture; if you have too many large chunks of nuts, the cookies tend to break apart easily.)

Use a teaspoon to measure out mounds of dough. Roll into balls and place on a lined baking tray.
Bake at 180'C for approx 15-18min, until they are just a touch golden - it's better to under-bake rather than over-bake these cookies.
Sift the extra icing sugar over them as soon as they come out of the oven; and again once they've cooled down.
Store in an airtight container -  a pretty jar will do :o)


Happy baking!

xxM

Tuesday, November 10, 2015

Drip Cake with Macarons

Drip cakes (inspired by Katherine Sabbath) are really trendy right now.
They look pretty easy to make - don't they? It's just an iced cake with a bit of ganache poured over the top and a bunch of goodies piled onto that. Easy-peasy.
Yeah, right!
It's surprisingly tricky to get a good looking drip-effect, for one. Especially when you're doing it in 40'C heat! So mine dripped...dripped... and dropped..!


And then this particular cake (made for my macaron-loving niece) involved 4 batches of those tricky treats to get the different colours and flavours of macarons which I wanted to decorated the top of the cake.
(Read about my first forays into macaron making, and the recipe I still use, here).


Despite that, it is definitely a style I'm going to attempt again. Just remind me to do it on a cool day!


See a great short video on creating a drip-effect by Renee Conner here. (Wish I'd watched that first!) 

Happy baking! 

xxM 


Monday, November 2, 2015

Witch and Wizard Cake

Note to self: Read Notes to self! Because I've noted this before... take before and after photos!

So, you're just going to have to take my word for it...

This was a cake that I made as a surprise gift for a friend's Halloween birthday party.
It was covered in light blue fondant that I then airbrushed with purple in a few areas, followed by a mixture of navy blue and black.
The speckled-star effect is created by flicking white gel colour onto the airbrushed background with a stiff-bristled small paintbrush.


The him & hers witch and wizard toppers are made out of a fondant / modelling chocolate blend.


I wish I'd had the time to make a lower tier, but alas... time was in short supply last week, and magic time-turners were out of stock.
So I'll use that excuse to explain why there's no "before" picture...!


Happy decorating!

xxM

Sunday, November 1, 2015

Halloween Cookies and Cupcakes

Ok, so on further consideration I won't get away with a simple two-colour palette for Christmas. (And I did give it serious consideration. But it's that darn green, always creeping in and wanting to be part of the action...!)
I have managed to squeeze in another set of dual-tone cookies, though, before we get caught up in the red, white and green onslaught!

Halloween is met with mixed emotions in SA; so I've stopped offering classes with this theme, unless specifically requested. But I love decorating Halloween-themed treats, and I jump at the opportunity to do so when I can. This year it was by squeezing in a mid-week specially-requested cupcake class, and making some cookies as a gift for a friend whose party was on the 31st.

 I nearly made the cupcake class a simple combination of orange and black, but added some purple in the end...


The cookies, however - I stuck to my double-barrelled guns. (One colour in each barrel - get it?!)

Here are a couple of process shots:

The cookie was flooded with white royal icing, left to dry then airbrushed with yellow, followed by orange around the edges to create the "glow".  The image was sketched onto the completely dried icing. 

The outline of the silhouette-image was piped onto the cookie with detail-consistency (soft peak) royal icing then filled in with flooding consistency icing. 


And the finished products: 


Happy Halloween-decorating!

xxM