Laman

Monday, December 29, 2014

Hot Chocolate Spoons


Hello! I hope you had a wonderful, fun and happy Christmas.
After a day shopping, out walking with the family or vegging out - settle in with a movie and hot chocolate that can only be made better by Doritos and these: chocolate spoons.

I've made similar before, but [of course] these weren't big enough.  So here's a bigger, better, sprinkled version.

 I picked up some plastic dessert spoons from Sainsburys [but these can be found in most supermarkets] and used the chocolate, sprinkles, chocolate chips and marshmallows I already had in my cupboard.
Other than that, there are no other requirements - let's go.
Melt the chocolate of your choice in the microwave in a small ramekin/bowl that will allow you to fully submerge your spoon in - coat and fill the entire spoon and allow any excess to fall back in to the ramekin/bowl before leaving to rest on a baking paper lined surface:

[if the spoons do not lay flat for the chocolate, prop the ends up with another spoon or something that will act as a ledge, like a pen/pencil].
Once the chocolate has semi-set, add any decorations:
[These may cause the chocolate to move and slightly over spill - no panic]
Once almost completely set, remove the spoons from the baking paper and pop them on a plate to fully set in the fridge. This will now have 'neatened' the spoons and leaves a nice puddle of chocolate for you to eat whilst you wait.  Once fully set [5 minutes should do the trick] remove and they are ready for adding decoration, flavour and marshmallows to your hot chocolate:
[Green & Blacks is my weapon of choice - thoroughly recommended - though if you fancy making your own - here's a post from the archives to make your own from cacao].
These are perfect if you still have children around that need a little entertainment, or to make movie time a little more special - they can be made and used within half an hour and give them a chance to get creative.  Marshmallow pops are also fab to use as stirrers.  Enjoy!
see you on the other side of the year - if you are after any crafty New Year projects, there are pom pom sparklers, ribbon garlands, tassel garlands and chocolate sparklers to keep you busy? x

Saturday, December 27, 2014

Christmas Time!

Hey everyone! Things have been surprisingly hectic since my last post, but I really wanted to make sure I got in at least one more before the New Year.

Christmas was surprisingly positive this year. Last weekend I met up with my friends for a pre-Christmas get together which consisted of eating a lot of unhealthy food and being silly whilst watching various funny videos on Youtube! At one point, we did a present swap which I'll come back to later! We all went for simple cosy outfits, perfect for lounging about.
Luna looked lovely in what is actually a Primark dress! It works so well for a casual classic outfit! Sammi looked darling in her Angelic Pretty OP. I love the Coat of Arms print, and am tempted to try finding it myself!

Following on from Saturday, I was in a mad rush to finish my Christmas shopping in time. I always leave it until the last minute because I never know what to buy for my family (and they really don't help with their constant refrain of "um... I dunno"!) Still, motivate myself I did, and I got things sorted out in the end, with everything safely under the tree by Christmas Eve. This was the day I got the new Gothic & Lolita Bible in the post, and guess what? I'm in it!
Typically, they got our names the wrong way round, but oh well! We had been fretting over whether or not they would use our photo as we remembered feeling very squashed up and inelegant as it was being taken at Revelry in September. I'm so pleased they decided to use it in the end! This was my first time buying the Japanese GLB and I'm glad I did. I got some major inspiration from the street snaps and I might do a review on the issue in case anyone's interested!

Christmas Day turned out to be sunny and pleasant, and I decided to wear Meta's Sweet Cherry.

I'm wearing the OTKs that came with my Princess Wardrobe Dress Set. I needed to wear a suspender belt to hold them up! Do brand socks stay up on anyone?! If they do, I suspect these people are a lot shorter than me!

My favourite gift was a Husqvarna Huskylock S15 Overlocker, courtesy of my parents! I am so excited to finally be able to overlock/serge seams properly (I lead a thrilling life...) and this machine does just what I need it to do, whilst being very easy to use. Such a wonderful gift! I also got some lolita friendly items.

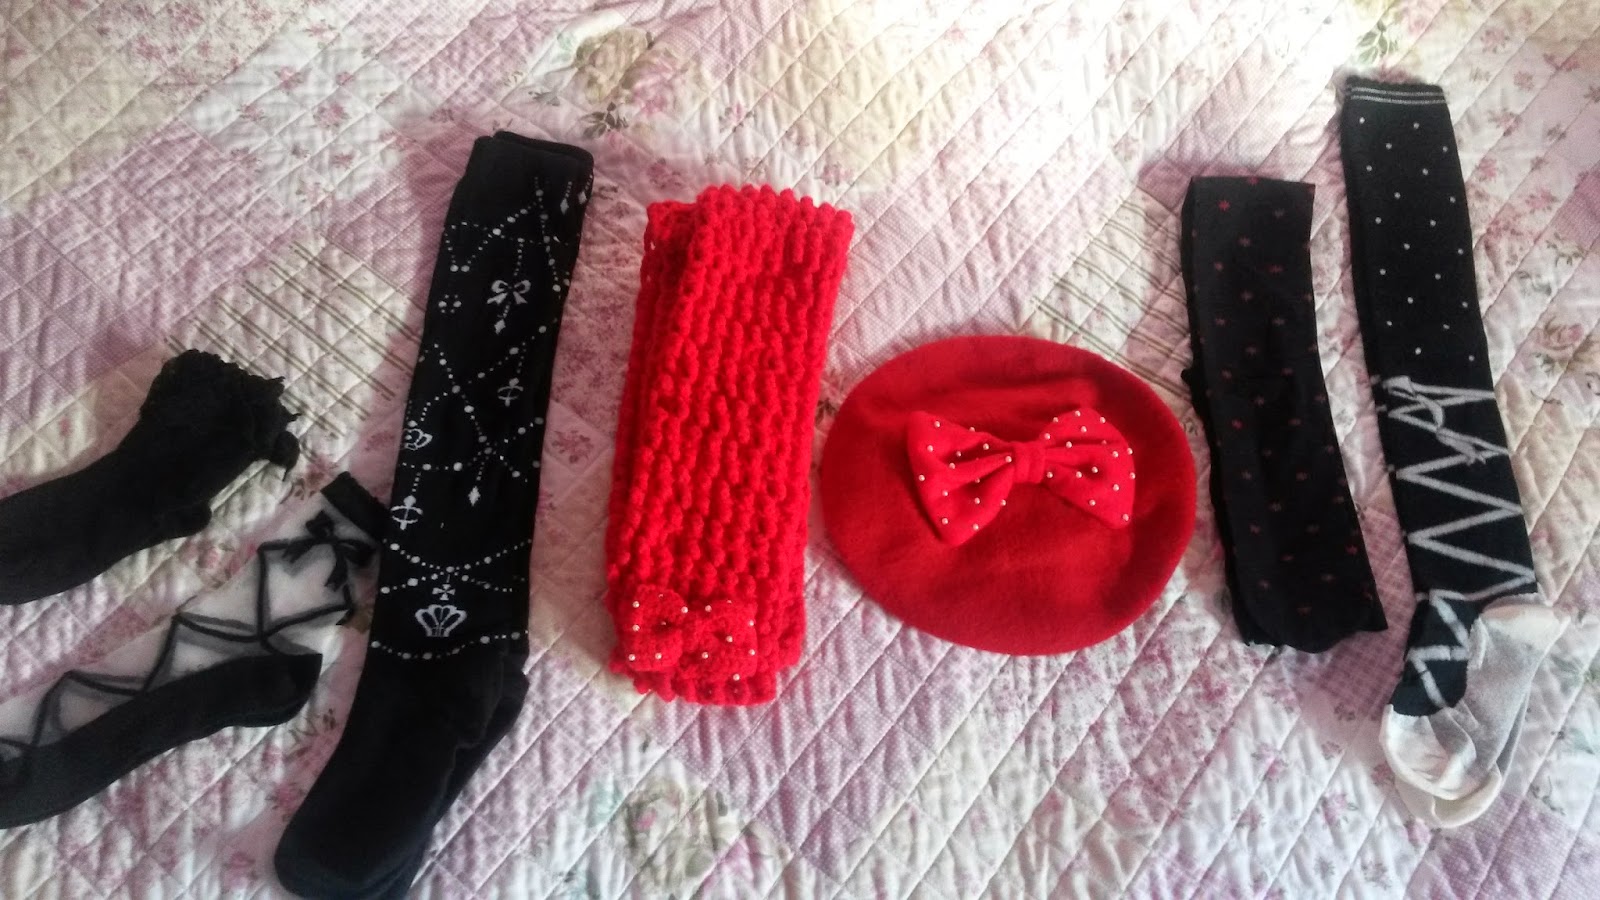
I ended up with so much legwear! Love it! My collection was always rather lacking as I generally stick to plain (read: boring) tights because I have a bit of a fear of OTK socks. They never stay up on me! I've just ordered a new suspender belt which will hopefully have long enough straps to sort this situation out once and for all! I was majorly impressed by the scarf, which was made by my friend Sammi. I'm going to keep pestering her until she opens a shop with all her fabulous creations!

I spent Boxing Day chilling out as it was one of those rare occasions when I had the house to myself all day. I also got to grips with my overlocker after an hour of trial and error. 

Today, I went out to buy some fabric for the bloomers I plan on stocking in my shop, and spent the evening doing some sewing. A productive day! Here's a preview of the type of bloomers I'm working on.
Simple and comfy! What more can you ask for?! I made that pair for myself and they are now my favourite bloomers to wear. If I like them that much, hopefully there will be other people out there who will, too! Fingers crossed! 

So, that was my Christmas! I suppose the next important event will be New Year, but I never celebrate that as such. I might make some resolutions, though.

I hope you enjoyed this post, even though it probably seemed rather fragmented and random! What did you all get up to over this past week or so? I'd love to hear about it! 

See you next time  

Thursday, December 25, 2014

Chocolate Dipped Ginger Biscuits

Well, I wasn’t planning on posting anything on Christmas Day. And I very nearly couldn’t (a recent storm took out our internet connection). But, I made a plan and here I am :o)

Actually – it’s not much of a post, but I loved the way the chocolate draped itself on these mini Xmas-tree biscuits, so I felt compelled to share before their relevance expired!


And when I say “draped itself ”, that’s exactly what I mean. 
I couldn’t have done that  intentionally if I tried – my artistry with chocolate being pretty limited.
I dipped the cookies into a bowl of relatively thick melted chocolate, and the edges of the trees created the folds of chocolate as I turned them over. Pretty, huh?!


Gingerbread cookie recipe here


Have a lovely Christmas!

xxM


Sunday, December 21, 2014

Pudding-in-a-Jar

I'm doing a "rustic" Christmas eve dinner this year. (And every Christmas to come, I've decided.)
I don't have enough stylish silverware and glassware to do an elegant table.  
So, lace-trimmed hessian for an overlay, twine-wrapped candles, and sprigs of rosemary at place settings will do instead. 
And what could be more rustic than serving pudding in a jar?! 

This is layers of sweet butterscotch sauce, topped with a creamy custard and finished off with cinnamon brittle. It is simply delicious! 


Pudding - in - a - Jar
Recipes by Tea, Cake and Create


Butterscotch Sauce

250ml cream
70g butter
200g brown sugar
2 tsp vanilla extract

Place all the ingredients in a heavy-based saucepan and stir on low heat until the butter has melted and the sugar dissolved.
Leave to simmer for approx 10 minutes, until the sauce is thick and glossy.
Pour into the bottom of the jars. Chill (not you - the butterscotch! You've got work to do!)


Custard
1250ml (4 1/2 cups) full cream milk
200g sugar
3 large eggs
2 1/2 tbs corn flour
2 1/2 tbs cake flour
1 tbs custard powder
1 tsp vanilla extract
2 cinnamon quills
peel of 1 naartjie (mandarin, satsuma, tangerine) - not essential, but adds a lovely subtle flavour.
pinch salt


Beat together the eggs and sugar until pale. Beat in the flour, cornflour, custard powder, vanilla and salt.
In a large saucepan, boil the milk together with the cinnamon quills and naartjie peel.
Pour the hot milk into the egg mixture, then return to the saucepan, and stir on low-medium heat until the mixture thickens.
Allow to cool slightly, remove the naartjie peel and cinnamon quills, then pour onto the chilled butterscotch layer.


Cinnamon and Sprinkle Nuts Brittle

Sprinkle nuts are simply small pieces of peanuts. You can chop the peanuts up yourself, but the store bought "sprinkle nuts" have a neat uniformity to size and shape. Alternatively, use any nuts of your choosing.

Ingredients:
200g (1 cup) white sugar
120ml golden syrup
60ml  water
140g sprinkle nuts
2 tsp ground cinnamon
1/4 tsp salt
2 tbs butter
1 tsp baking soda

Place baking parchment on a large cookie sheet.

In a medium-sized heavy based saucepan on medium-high heat, mix together the sugar, water, syrup, cinnamon and salt. Stir continuously until the sugar has dissolved. Use a damp pastry brush to brush down any sugar crystals from the side of the saucepan.
Stir in the nuts.
Continue to simmer until the mixture reaches 150'C on a candy thermometer or until it reaches the hard-crack stage.
Remove from the heat and immediately stir in the butter and baking soda.
Pour onto the prepared cookie sheet. Use two forks to separate and spread the mixture on the cookie sheet.

Allow to cool.
Snap into shards.


For serving:
Sprinkle cinnamon on the surface of the custard.
Top with shards of cinnamon brittle. (Don't do this step earlier, otherwise the sugar in the brittle begins to dissolve.)


Rustic table decor - check
Rustic pudding - check
... Now just to find enough jam tins to serve the coffee in  ;o) 


xxM 

Saturday, December 20, 2014

Gingerbread House

I'm not sure why I haven't made a gingerbread house before. It might be because they look like hard work (and I'm on holiday,  see!?) and it might be because it won't last a day in the Durban humidity once it's constructed.
But, despite the reasons not to, this year I did.

I' won't share the template with you - because it was a bad one! (Whether the architect or the builder is to blame, I can't say!)
But I will share that using melted white chocolate would be my choice of "glue".
It's pretty much the only thing I'll do the same again next time.
So, yes - I'll be making one again next year.  (insert resigned, weary, what-am-I-doing-to-myself voice here!)


xxM

Friday, December 19, 2014

Meringue Santa Beards

Nope. Not kidding.

Today is the day of my work Christmas party and our mission, should we have chosen to accept it, was to bring something along for the 'photo booth'.  This is what I am taking in my work bag.

What I Used:
1 egg white
40g white super fine caster sugar
Template
[right click to save and print to your computer]

I started with a classic meringue girls base [40g of super fine caster sugar heated in the oven
and then gradually added to a whisked egg white until glossy and firm].
I then lined a tray with baking paper and drew a template beard to place underneath it:
I then used the back of a spoon to start spreading a generous layer of the meringue within
the shape of the template:
Once complete, I placed a wooden skewer at the bottom, with a good 2 inches or so covered
by the meringue to ensure it held in place:
....it was then baked in a low heat oven [around 90 degrees C] for 2 hours until crisp and easily lifted from the baking paper [add on more time if the meringue does not remove easily]:
Beats a beard cardboard cut out any day.
How have we been having Christmas without them?
Wish me luck for getting them all to the party in one piece.
Have a great weekend - we're nearly on the home straight! x

Thursday, December 18, 2014

Christmas Cookies: Babushka Dolls

Tonight's the night - time to wrap Christmas presents! 
My husband is out, so I can do his too (and also make sure they all get wrapped the way I like them to get wrapped. What, me... a control freak? Noooo! Okay, maybe a little. But I can control it!)

And so it's time to wrap up a few other Christmas things....


This year's Xmas cookie line-up. 
I had to sneak the Babushka's in there, because I didn't make them for Mothers Day, and I couldn't let a year go by without them! 

This is how I do their faces. By no means do I think that it is the definitive way of doing it, or the way they have to be done (see - I can relinquish control!), but it's a quick and easy, and gets cute results. 


Flood a round / oval for the face  (with flooding consistency royal icing)


Immediately pipe on (wet-on-wet, with flooding consistency royal icing):
- the rosy cheeks
- the hair
- the eyes.


Use a toothpick or scribe tool to drag the icing outwards  from the eyes to create the eyelashes.


Leave the face to dry, before piping on a little heart for the lips. Use piping consistency royal icing for this. 


Happy decorating (and gift wrapping)!

xxM 

Wednesday, December 17, 2014

How to Make Meringue Snowmen

Do you wanna build a snowman?
These little meringue treats are the perfect kitchen craft for kids big and small - either on their own
 or as a food toppers.


1 egg white and 40g of fine caster sugar made a total of 10 snowmen for me - but it all really depends on the sizes you want to create.  Using my new favourite method [the meringue girls way] I whipped up my meringue and transferred in to a piping bag:
Creating a variety of sizes, I piped meringue flat balls [sort of] around my lined baking tray - used the tip of the piping bag to level off tops so that stacking them later is easier [but don't worry if you forget/don't, I have a trick later on to do this without smashing the meringue]:
Once you have created as many meringue snowmen pieces as possible, pop the tray in a oven at around 90 degrees C for 2 hours:
Once ready [they should be easily removed from the baking sheet] you can start building.
Arrange your shapes so that you can stack them - if you have a shape that needs leveling at the top or bottom, simply apply a little pressure against a work surface and wriggle the meringue a little to flatten.
Then attach your snowballs together with a little melted chocolate or icing:
...and as a final detail [and excuse to buy more chocolate], I added a chocolate Rolo hat to a few,
fixed in place with more melted chocolate:
[do I just about get away with it? If time had allowed, I would have swapped the chocolate buttons for giant ones, to place under the rolo and act as a hat rim - next year.....]

Once you are happy with your heights and snowman shapes, you can begin decorating.
With a black icing writing pen, I added very simple eyes and buttons:
[you could also use sprinkles and sugar shapes to create decorative buttons]
...before finally adding an orange nose:
[if you have time, you could pipe royal icing details such as a carrot nose, scarf or piped chocolate arms to attach with more chocolate or icing]
They don't exactly look like Raymond Briggs snowmen, but they still look pretty cute.
add cocktail sticks to the bottoms to help secure them in any cakes, cupcakes or Christmas cakes:
more Christmas meringue here.
see you next time x
P.S - sorry if Frozen songs are now stuck in your head for the rest of eternity [as if they weren't already].