Laman

Friday, January 30, 2015

Maiden Clothing Review

Recently I made an order with Maiden Clothing, a place where you can buy secondhand lolita clothing, very much in the same vein as Closet Child. 

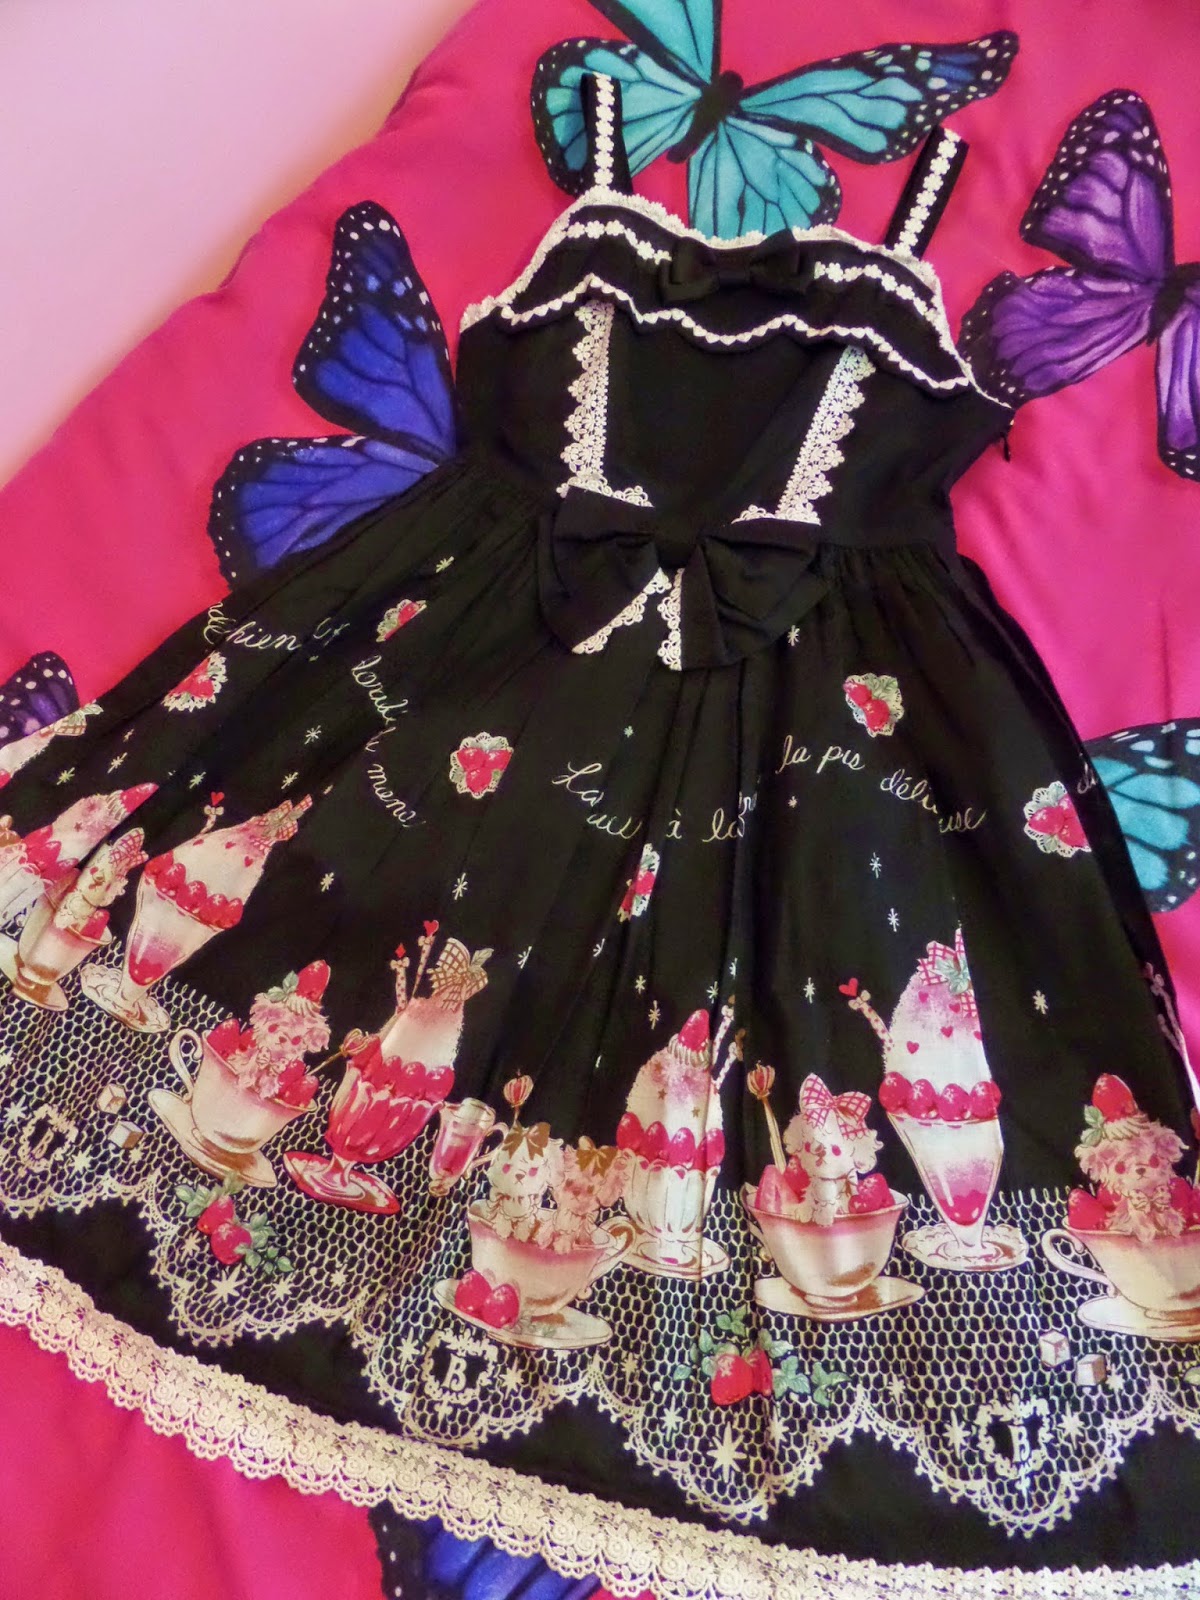
As I was browsing the jumperskirts, one dress in particular caught my eye-- Baby's The World's Most Adorable Dog and the World'd Most Delicious Frappe print! I particularly liked the lace details and seeing as the price was really good, I decided to purchase it.

Ordering Process
To buy from Maiden Clothing without a shopping service, you must use the international order form, the process of which is explained in a clear, and helpful fashion on their website. On 7th January, I sent them a filled out the order form. 

After this, I waited for them to get back to me in order to confirm whether or not I had been successful in bagging the item. I received a response on 9th January, stating that I must pay through the payment processor NICOS, and that I have a week to do so. They responded under the handle "Pure Sound", which I believe is their parent company.

Several hours later I received an e-mail with a link to the NICOS platform where I used my card to pay for my dress, the shipping (for me it was 1800 yen, which I thought was incredibly reasonable) and a credit charge of 200 yen.

One thing to bear in mind is that your card company may charge you a small fee for paying in a different currency. I got a £2.50 transaction fee and a £1 purchase fee. Swell.

Shipping
On 10th January I received an e-mail saying my payment had been accepted and processed, plus I was given a tracking number.

The dress made it into my possession on 20th January, although it made it into the UK several days beforehand and I had to wait for customs to clear it, plus wait for my payment of the import VAT to go through.

Packaging
The package was made of really strong, thick paper/thin card, and whilst battered a bit, arrived very much intact.
To open the package I simply had to manually tear along a perforated strip. I found this very handy as I hate struggling to get into tough boxes. This also meant there was no chance of me inadvertently damaging the dress with scissors.

The dress was folded and securely sealed in a resealable plastic bag. There was no receipt, notes, or any sort of branding from Maiden Clothing. Straight to the point packaging, indeed!

Product
My dress was described as being in 3/5 condition, and that I should expect some signs of wear and tear. I carefully inspected the dress multiple times and was unable to find anything wrong with it at all! It arrived smelling of fresh drycleaning and appeared to me to be in mint condition!

I love this jumperskirt! I simply cannot stop touching the gorgeous lace! It is so thick and soft! I am very pleased to own this dress due to the fact it suits my often "bittersweet" sensibilities, plus the contrast of black with white lace creates a very old school vibe which I love.

Summary
I found ordering from Maiden Clothing to be a straightforward and positive experience. They are quick to respond to e-mail orders, post your order out very fast, and their packaging is great, if rather impersonal. I had no problems whatsoever with the item I received, which was in much better condition than described on their site. I would definitely order from them again!

I hope you found this review helpful! If you have any questions then please feel free to leave a comment! See you next time  

How to Make 3D Geometric Paper Hearts


I feel like it’s been a while since I sat down with some paper, so recently I changed this and went
back to basics with cardstock, pencil and scissors.  With the day to celebrate the people you love around the corner, I couldn’t help but make a few paper hearts with a geometric pattern to use as embellishments – but these are perfect for use all year round.

What I Used:
Cardstock / Paper
Template
Scissors / Ruler

[right click and save to your computer to print]

Cardstock works best for this project as you need the shape to hold and I picked up some discounted A5 card blanks from HobbyCraft in a range of pastel colours that were perfect for these mini shapes.
 Using the template, trace and cut out the outline of the heart on to your card
[don't mind my lined paper original template]:
With a ruler, carefully score lines [following the guides on the template] with your scissors on to the back of your card - starting with the vertical centre:
...then cutting across the horizontal, before joining the remaining points to the created centre point:
Turning your heart over, you now want to fold your card towards you.  Start with the vertical line:
...then the horizontal:
..and then the remaining in turn from the outside in.  Once you reach the inverted triangle of
the heart, you want to fold the card away from you, to create the 3D effect:
Then, once all your folds have been made, your heart is ready to be hung, glued or displayed 
wherever you like:
I’ve a few more DIYs using this technique on the to-do list, so look out for them soon.
 
 see you next time x

Monday, January 26, 2015

Pom Pom Letter | Cut Out + Keep

 Just before Christmas, I was given the opportunity to try out the Multipom - a pom pom maker
 with a difference: allowing you to create several pom poms at a time.  
I used them to make a pom pom display letter - perfect for cosy Winter home decor.
You can see how I did this on the Cut Out + Keep website.
Perfect for bedroom decoration and easily customised with colour and texture.
see you next time x

Sunday, January 25, 2015

My Lolita Wardrobe 2015

So... yesterday I finally completed my wardrobe post for egl's January theme!

There are a few bits and pieces missing from it, like matching headbows, detachable bows and a ridiculous assortment of detachable waist ties I practically never wear on any of my dresses or skirts, so forgot to attach for the photos.  

Still... I'm quite pleased with my post this time round, and I have greatly improved on my skills in presenting it, even if I did end up having to use my phone's camera part way through! I spread the photo-taking over two separate sunny days when no-one else was home so I could have complete privacy. I think my family would find my wardrobe archiving bizarre, and I didn't want any interruptions during a process I find soothing and therapeutic. Editing photos, uploading photos, and writing up the post, with Fall Out Boy's Save Rock and Roll as my soundtrack, took up my Saturday evening. Oh the relief I felt when I finally finished! 

So without further ado... here is the link to the post! Just click on the photo and it'll take you right there!


I hope you will enjoy it, and I would love to know if any of you did wardrobe posts, too! Leave links in the comments and I'll check them out!  

White Stamping on Chalkboard Cookies

Stamping on cookies seems like a bit of a cheat - but it's so cute, effective and quick that I can't let the purist in me get the upper hand. I love stamping on cookies!
I've posted about it before (here) - a technique using a stamping pad, which produces a great clean effect.
But because I was using white "ink" this time, I painted it onto the stamps:


What you'll need:
Cookies flooded with black icing - that have dried for at least 24 hrs
Rubber stamps - used solely for food, they must not have come in contact with non-edible ink
White gel colour-  mixed 1:1 with clear alcohol
A firm, square-tipped paint brush
Royal icing - for additional details

(It's a good idea to have a few spare cookies to practice the technique on!) 

Paint the white gel mix onto the surface of the stamp - make sure that all the details are covered, but that there aren't any blobs obscuring fine details.

Press the stamp firmly onto the flooded cookie - apply extra pressure in the centre which is where there is often a slight dip of icing.

Allow to dry.

Add royal icing details.

(If you want the speckled effect that I've created on these cookies, dip the paintbrush in the white paint and run your finger over the bristles about 20cm above the cookies.)


Happy stamping!

xxM

Thursday, January 22, 2015

Back to School Cookies

Back to school this week - and I'll say it without an ounce of maternal guilt: at-friggin-last!
I love my children, but 6 weeks of having them at home has done my head in. I don't even mind having the morning rush again - because it means sanity will follow for a few hours!

So, I truly am celebrating "Back2School" with these cookies!


I need quiet and calm to be creative, so I want to tell you, it was no easy feat decorating these cookies during the holidays with constant calls to (mom) duty. But somehow I managed. I did not manage to take any work-in-progress pic's though, so my only offering is a something you probably already know and do; but here it is anyway:

Don't throw away your left over royal icing, freeze it until you need that colour, or alternatively mix it all together when you need black. Purples are especially easy to turn to black with the addition of a bit of super black gel. 


Make sure that the container you freeze the icing in is air-tight.
It takes about an hour to thaw.
And if it does develop a crust around the edge, just scoop out the soft icing from the centre, discard the rest.

That's my bit.
I have to go rest my head.


Happy decorating!
xxM

Tuesday, January 20, 2015

Cut Out + Keep Jewellery Week


Every day this week I will be featuring on the fab Cut Out + Keep, sharing easy-to-do and
perfect-for-beginners jewellery DIYs.


Do pop over to the site and have a look around - there is a huge catalogue of DIYs - from fashion, beautyfood and jewellery.

As you will know, I am certainly a beginner in terms of jewellery making, so this was a great opportunity for me to try some new ideas as well as share some projects already shared on this blog.  I'll update the space below with the DIYs as they are shared each day.


Monday:
Tuesday:

Monday, January 19, 2015

24/7 Lolita: Reality or Fantasy?

Sometime recently, someone began a thread on a facebook lolita discussion group about whether or not there was anyone who wore lolita fashion round the clock. Some people claimed they did, but mainly, people were very disbelieving that it was something anyone could do, or would want to do. 

Ribbon Rose Room Wear by Victorian Maiden. How lovely is this!?

I wouldn't be opposed to the idea myself. On my down days, I often feel as though lounging around the house in bland, sagging clothes can make me feel even more miserable than I would if I had something bright and cute to cheer myself up with. For such occasions, it is possible to find really adorable items (usually labelled as "roomwear" online) which are both comfortable and stylish. Perhaps that's something I should look into.

However, self proclaimed lifestyle lolita or not, there are always going to be occasions where you can't wear lolita. When I do land a job (which will most likely be office based), I will have to wear clothing which is "professional". Some people are lucky enough to work in environments where they can wear elegant classic pieces, or incorporate lolita items into their work outfits to create a look that is professional, and yet unmistakeably lolita-influenced. Some people even wear full lolita to their work place! I may not be that lucky, but it's fine-- more money, more brand at the end of the day! You work to earn a living, not to look cute (though if you can do both, you really are living the dream!) I expect 24/7 lolita would be easier for those who are unemployed, students, housewives or in a workplace with aforementioned lax uniform policies.

If we ignore the trouble that workplaces can cause in terms of disrupting this 24/7 lolita vision, then let's think about this in terms of only wearing lolita in one's free time.

Rabbit Apron by Baby, The Stars Shine Bright

In a separate thread, someone else claimed they did absolutely every one of their pass times in lolita, including cycling! I've sometimes thought about making or buying a cute apron I could wear over my lolita clothing for eating anything particularly messy, or when cooking. But somehow, there are still times when I don't even feel like putting on a dress. Do I really need to wear something that may get caught in the food, catch on something, get super messy, make me sweat more than something else etc for the sake of calling myself a 24/7 lolita? At those times, it wouldn't be worth it for me, and I would instead make workarounds. Something about spending the day, for example, in a cute cutsew and bloomers is appealing to me! In this way I would still be wearing something related to lolita, without it being impractical and uncomfortable.

3 Piece Night Set (2003) by Baby, The Stars Shine Bright. 
I must make myself something like this!

So, do I think 24/7 lolita is possible? Definitely. Is it something I can claim to take part in right now? Definitely not! Still, I figured it would be fun to come up with some ideas for a 24/7 lolita lifestyle, aimed at those who want to wear lolita or lolita inspired clothing in casual environments such as at home.

  • Get yourself some cute, comfortable roomwear! This is great for when you won't be leaving the house, and still want to feel dolled up!
  • Pretty nightgowns will make bedtime feel more whimsical! Sweeter lolitas may favour pastel colours and kawaii prints, whereas classic and gothic lolitas may feel more inspired by Victorian inspired gowns.
  • Have some cheaper items set aside for messier, less elegant days! Now is the time to lounge around in bargain brand items and old Bodyline pieces.
  • Bloomers make great pyjama shorts, and are perfect for days at home! You could get a longer pair for going outside and gardening if that's something you're into.
  • Think about dress cuts. Skirts sitting on your waist all day may not allow you to feel relaxed, so opt for jumperskirts with high waisted cuts so there's no pressure on your stomach.
  • Wear cute, lace topped or patterned ankle socks as opposed to plain ones!
  • Have a pair of slippers which suit your lolita style and will complete your "home" coordinate!

How do you feel about the idea of 24/7 lolitas? I'd love to hear what you think about it! Thanks for reading and I'll see you next time!  

Sunday, January 18, 2015

Apple and Cranberry Tea Cupcakes with Custard Cream Cheese Icing

Do you feel that when Christmas is over, it's over, and needs to stay that way until next December? That reminders of the merriment now past, and a whole 340 days away, are just too painful?
I kind of do, too.  But wait - please don't put this in your to-read-in-December-only folder!


I know this recipe sounds very Christmassy. There's an explanation for that. (Bear with me!)
  As part of their Christmas range, Woolworths was selling a really cute tin of apple and cranberry infused rooibos tea. I don't drink fruit teas (unless they're iced), but I really liked the tin.  Knowing that good things come to those who wait (at the post-Christmas sale!), I waited and snapped it up for 50% off.
Bargain ;o)
But I still have to make use of the tea to warrant the purchase.
It smells heavenly, and will make a great iced tea; and also... cupcakes...!
You don't have to use this particular infusion - although I have teabags to spare if you'd like some :o) - any fruit tea will do. (How exciting are all those possibilities!)
And if you're not a rooibos fan, no problem - you don't taste it in the cupcakes.


Apple and Cranberry Tea Cupcakes with Custard Cream Cheese Icing
Recipe by Tea, Cake and Create


Dried Apple 
(recipe adapted from Your Family Magazine)

2 apples, thinly sliced
30ml caster sugar
30ml boiling water.

Mix the sugar in the boiling water, until it is dissolved.
Brush both sides of the apple slices with the sugar syrup and place the slices onto a wire rack.
Dry out in the oven for approx.1 hour - the edges of the apple will start to curl, but they will still be soft enough to bend.
Remove from the oven, and pitch at the base to enhance the folds.
Cool in an egg tray to maintain the shape. (If you don't have a plastic egg tray, cover a egg carton with pieces of foil).


Apple and Cranberry Cupcakes
Recipe by Tea, Cake and Create

Preheat the oven to 180'C
Line 2 x muffin pans with cupcake cases. Make 20-24 cupcakes.

Ingredients:
250g butter
150g caster sugar
3 eggs
160ml apple and cranberry infused rooibos tea*
125ml buttermilk
320g flour, sifted
1 tsp baking powder
1/2 tsp baking soda
80g dried cranberries

*to make the tea, pour 160ml boiling water over a teabag, and steep for 20 minutes.

Cream together the butter and sugar.
Add the eggs, one at a time - scraping down the sides of the bowl between additions.
Beat until light and fluffy.
With the mixer on low speed, alternate adding the dry ingredients with the buttermilk and tea. Begin and end with the dry ingredients.
Fold in the cranberries.
Spoon into the prepared cupcake cases.
Bake at 180'C for approx 20min, or until a cake tester comes out clean.

Remove from the muffin pan to cool.


Custard Cream Cheese Icing
Recipe by Tea, Cake and Create

100g butter,  at room temperature
50g sifted icing sugar
250g cream cheese, chilled
180ml thick custard, chilled

Beat together the butter and icing sugar.
Beat in the cream cheese, followed by the custard.
Pipe onto the cooled cupcakes.
Decorate with dried apple.


Enjoy!

xxM

Friday, January 16, 2015

Birthday Wishes Bottle


I had no idea what to call this project [so I've called it a few things].....it's been on my 'ideas to try' list for years and I made it my mission to finally create it.  It incorporates my favourite Christmas style decorations in to the other months of the year and creates a mini bottle snow globe, perfect for any celebration, but I've used it as a little bottle of birthday wishes.

What I Used:
Mini Bottle [I found a pack of 6 in The Works for £1]
Confetti
Thin Wire
Glue Gun
Water / Glycerine

With the correct items ready, this is actually a very simple and quick project to complete - easily personalised and creates many more ideas I want to try to add different elements, but the basis is the same for any direction you may like to take it.
To start, I selected two identical pieces of table/card confetti and cut a small section of
 0.5mm beading wire, to around 5cm in length.  Using my glue gun [for ease of use and speed -
but any very strong, water-resistant glue will do] I sandwiched the wire between the two pieces
of confetti:
[Don't worry too much at this stage about the neatness of the glue.  Once completely dried, you
 can cut away the excess with scissors to make it a little neater - once submerged in the water later, the glue will be even harder to see, so do not let this part worry you too much]
Finally, spear the top of the wire into the cork stopper and test that when added to the bottle it
hangs in the position you would like.  Trim any excess and fix the wire in place with a little
glue to make sure it is completely secure [if you have any problems fixing your wire in to the cork, use a needle to help create a hole for you]:
Next, on to the water and glycerine [I picked mine up from the baking aisle] which will make all the glitter/confetti inside float beautifully around the bottle when shaken:
Fill your bottle to the neck with water and add one small drop of glycerine [if able, dip the handle of some cutlery in to the glycerine and allow a drop to drip in to the bottle].  Give the water a good stir to prevent the glycerine from sitting at the bottom and then add your glitter/confetti/decorations:
If any glitter gathers at the water line, use a cotton bud to help remove it - this hasn't mixed
with the liquid and will continue to sit at the top, even when the cork is added and bottle shaken,
 so to neaten the look, I removed it before adding my cork.
Finally, to seal the cork and stop it from absorbing all the water, give the bottom half a
good coating with water resistant glue and this will also secure the cork in place.
Now shake it up!
...and make a wish:
This can be adapted for any event, holiday or excuse to give someone a little pot of
personalised glitter, good luck, love or magic.
Have a great weekend x