Laman

Monday, March 30, 2015

How to Make an Easter Egg Hunt Bag

For Christmas 2013 I made present sacks, personalised with Sharpies, to fill with presents.  I really wanted to make a similar style bag for Easter, to keep eggs and other treats in for my nephew.
They are simple to make and can be kept for years to come - all you need is a pen and a bag.

What I Used:
Jute Bags [eBay]
Sharpies
Template 
 I created a template on the computer [I wouldn't be trusting my free-hand
 with this!] in a nice, clear font that could be seen through the bag and easily traced:
 The bag is made quickly and easily: place the template inside the bag and trace the letters
with a Sharpie, colour in any larger letters:
 ...and use lighter, finer strokes for the thinner, smaller letters:
I know what you've been thinking - does it fit a Cadburys Creme Easter Egg?  
Of course - otherwise, I would not be making it.
...and it is as simple as that.  Fill your bags up with Easter treats:
...and if you have a tote bag or plain gift bag, you can use exactly the same technique to
personalise them and present your eggs in this year, or store the rewards of an Easter Egg Hunt:
Its a great keepsake that can be used for years to come.
see you next time x

More Easter craftiness for your week here.

Thursday, March 26, 2015

Cream Cheese Pound Cake

Yeah, you've seen these mermaid cake pictures before... But I'm using them to prettify this page because I've only got 1 picture of the inside of the cake (which is what this post is about).
It was so hot on the day of the party, that the cake literally melted.
Ganache and modelling chocolate are great; just not outside in 38'C heat.


I'm incredibly thankful that the day I covered the cake was slightly cooler, stressed as I was about getting it done in time - squeezed into a couple of  hours between caesarian sections in the morning, and again in the afternoon. (Stop having babies, dammit - I'm trying to decorate cakes here!)

I used a cream cheese vanilla pound cake recipe for the cake; baked in three  7 inch pans (I wanted a tall cake) and coloured using gel colours. The fill between layers is marshmallow cream. 


Cream Cheese Pound Cake 
Recipe adapted from Taste of Home 

Preheat the oven to 180'C
Grease and line 3x  8inch round cake pans (or 7 inch pans).
You can also use a Bundt pan, but baking time will be considerably longer.

 Ingredients


250g butter
500g caster sugar
250g cream cheese
6 large eggs
125ml vegetable oil
450g cake flour
1 1/2 tsp baking powder
2 tsp vanilla extract
1/4 tsp salt


In the bowl of your electric mixer, cream the butter and sugar together until light and fluffy.
Beat in the cream cheese.
Add then eggs, 1 at a time; beating well. Scrape down the bowl between additions if necessary.
Beat in the oil and vanilla.
Sift in the dry ingredients, and mix until just incorporated.

Pour equal amounts of the batter into the prepared cake pans, and bake for approx. 30 minutes, or until a cake tester comes out clean.

Remove from the oven, and allow to cool in the pans before turning out onto a cooling rack.


If you want to colour the layers - weigh the batter; divide it into three bowls, then use gel colours in each portion.
I used sky blue (which becomes aqua because of the slightly yellow base colour of the batter) and a mix of regal purple and electric purple for the purple layer.


Happy baking!

xxM

Monday, March 23, 2015

How to Make a Easter Bunny Bag

If you have any Easter egg hunts planned, or just fancy making something to wrap your 
mini eggs in - here is a sew/no-sew bunny bag you might like to try.

What I Used:
Felt
Fabric Glue
Tapestry thread / Needle / Scissors
Paper / Pencil
To start, I created a bunny head template.  Fold a piece of paper in half and with a pencil and from the fold, mark half the width you require of your bag.  Next, mark your height, measuring from the bottom -  this area will form your bunny face, so round the bottom edges and curve them in slightly at the bottom.  From the top upwards, you can create an ear, that joins with at least a 2cm line to the fold of the paper.  Cut around your template and once unfolded, you should have a made to measure template.

With the felt of your colour choice, fold this in half so that you can create two heads the same size.  To make the construction a little easier, I pinned my template in place so that one side lined with the fold, creating one large piece of felt when cut and opened:
To one side of your felt bunny head, add your bunny features.  This can be sew, or no sew - using whichever craft supplies you have or like best.  You can decorate a full bunny face, or opt to create a mini bunny body, as I did - adding eyes and a nose to the left of the felt:
...leaving room on the bottom right for adding a small white round as a tail:
Next, to create your bag.  I chose the quick option of no sew and fabric glue, however; you could also sew your pieces together with a running or blanket stitch.
Outline the bottom half of the inside of one head with fabric glue:
...and then close your felt and match up your lines as neatly as possible, but any excess can be trimmed, so don't worry too much about it:
Whilst this dried and to add a little more detail [but entirely optional], I cut two thin strips of
white felt to  mark the ears, fixing in place with more fabric glue:
[don't worry if any glue spills over the edges - it will dry clear]
When tied, if your bunny ears are not long enough for your liking - likely if you have decorated a full bunny face or have a generous number of eggs to put inside, you can adapt your template:
Once constructed, leave your bunny bags to fully dry:
...and then they are ready to be filled and the ears tied to create your bag:

[nail varnish Easter Eggs here and lollipop pallet tray here]
see you next time x

More Easter DIYs here.

Sunday, March 22, 2015

what do you eat each week?

Dinner
What do you eat each week?  I wrote up a little schedule for us a few months ago.  It has changed a bit from previous years.  Currently for dinner we eat . . .

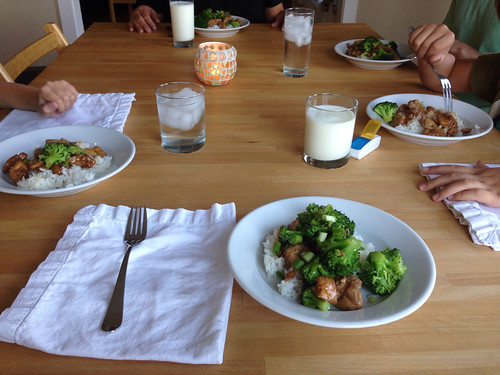
Monday--some sort of rice based dinner--probably our favorite type of dinner.  The photo shows the Sweet Soy Chicken from The Family Flavor.  We love this meal.  I always stir in some steamed broccoli.  Another huge rice-based favorite is the Southwest Chicken Salad from Summer Harms.  Oh, and another is her Maple-Mustard chicken.  (Love her recipes--wish she'd start blogging again).

Tuesday--pizza (this is take out.  We have a good pizza place locally).

Wednesday--soup or chili.  Love this night!

Thursday--leftovers.  If we don't have enough food left over then I whip something up from what we have on hand.

Friday--Mexican!  This is also take out from a local restaurant, or we eat there.

Saturday--date night.  Ken and I eat out and the kids usually go to my parents' house.

Sunday--"Sunday dinner."  Actually, it could be anything--likely it is something I don't have time to make during the week.  Tonight we are having chicken pot pie.  That sort of thing.  Or something special like steak.

I loved this post when I saw it on Cup of Jo.  Apparently these weekly rotations are trendy now?  The concept of eating the same thing every week used to be the butt of jokes, I think.  Personally, I love it because it is a comforting routine for the children and for us too--at it's easy to plan and do.

Do you eat the same thing every week?

Mermaid Birthday Party

Months ago when I was setting up my schedule for the first semester, I set aside this whole week to leisurely prepare for my daughter's mermaid-themed 5th birthday party.
As it turned out, I spent the whole of Monday morning on an outing with my son's class; Tuesday morning in theatre; Wednesday, the whole day on a course; Thursday and Friday back in theatre...(Oh, and did I mention my husband was away over the weekend for a conference?!)
So, by the time the party arrived, I was feeling ragged. But my sister came to the rescue and helped set everything up, and I think we managed to pull it off...
I say think because it was just a blur of activity (in ganache-melting 36'C heat!)
Here are some pic's before everything (including the guests!) melted....

Paper pompoms

 Mermaid photo prop (thanks to brett@acresofpixels.co.za) 


 The purple and aqua tutu that I made ... and that the party-girl refused to wear...


Children's treats table

Mermaid Cake

Sea-themed cake pops

...cupcakes

Shell and starfish cookies


Underwater details

 
...and the modelling chocolate mermaid cake topper, who succumbed to the heat like the rest of us!


I'll share the cake recipe I used on my next post.


Have a great week!

xxM

Thursday, March 19, 2015

Life Decisions and Lots of Sewing

I feel so bad about neglecting my blog but I'll be honest and say I had nothing to talk about. No new purchases, no big events, nothing. I haven't been feeling particularly inspired to write for those reasons. However, I am in a more positive place now.

I think lolita fashion has had an unbelievable impact on my life, from how I want to present myself to the world, to the very decisions I make as I try to navigate it. If you have been following me for a while, you will know that my experience of university was incredibly negative. It sucked a lot of energy from me, and made me constantly feel inadequate. While getting through it, all I had was, well, fashion to lift my spirits.

The past few uni-free months have been an unexpected time of self discovery. It must be all the free time to just... think. Exist. Figure things out. I have been working on my indie brand since 2013 but my studies kept me from devoting as much time to it as I would have liked. In the last few months, with full days to spend how I like, I've been able to come incredibly far. While that's been happening, I've been looking for jobs and failing miserably. I've had pressure from family, who expect that somehow, because I have a degree, I will quickly and painlessly fall into some grand corporate career making lots of money. Yeah, life doesn't work like that. But more importantly, that's not what I want out of life.

Me and my stall at a local vintage event in February 2015. 
One thing I've learnt over time is that life isn't set in stone. You are allowed to change your mind, and you're allowed to make decisions you didn't think you would even a year previously. So much has changed in a short space of time, and I think that by being open to that change, you will find out things about yourself you never knew. I never in a million years thought I would be doing this... sewing, drawing patterns, coming up with designs, trying to find events to sell at, etc. I used to be terrified of ever sharing my hopes and dreams, or even attempting to make them come true. These days, I feel a lot more self assured and a lot more motivated.

I'm no longer sat telling myself I'm a failure for not having a high flying, academic career (even if other people are). I'm no longer allowing people to make me feel silly for wanting to expand my business. Sure, I am most likely going to have to get a "sensible" career going to support myself all the while. But I'm working hard, I am ambitious, and I believe in myself. Now is the only opportunity I will ever have to try this, while I'm young and not running the risk of losing my house if it doesn't work out, so I'm taking it with both hands.

I like using gingham fabric. There definitely needs to be more gingham in lolita!
I have been given the chance to both work at, and have a collection of my brand's items in a local handmade boutique, something I am super excited about. Shops selling lolita or j-fashion specific items are few and far between in the UK. There's Sai Sai in Camden, but that's all I can think of off the top of my head. It would be great if there was somewhere else people could go to, especially in my area, where there is an established community of j-fashion enthusiasts, and yet not enough of a "scene" for anything alternative shopping-wise. I'm taking on a massive task, and I need to get it right. I am planning on stocking bloomers, berets, collars, and hair accessories, but eventually I hope to be making bigger, main items, if there's demand for it. Advertising will also be key. I'm nervous, but ultimately, I'm ready for the challenge!

I tell you all this with some trepidation. I am always expecting everything to go wrong-- a habit I am slowly unlearning. Please wish me luck in my endeavours! I will be incredibly busy, but I will make sure I am still checking in here as regularly as possible with outfit posts, reviews, updates, and more lifestyle lolita musings. Gotta love those. 

Tomorrow there will be a solar eclipse, a super moon, and it will also be the spring equinox. I have a really good feeling about it! Thanks for reading, and I hope you are all well! I look forward to your comments, and will see you next time. 

Wednesday, March 18, 2015

How to Make a Lollipop Pallet Tray

Buy all the ice-cream!
What I Used:
Large lollipop sticks / Small lollipop sticks
Glue Gun [you can read my ode here]
Craft knife / pencil

 To start the 'pallet tray' you'll need 22 lollipop sticks
[feel free to come in to their possession by buying 22 ice lollies].
With 4 of the sticks, mark the centre and then use a craft knife to split them neatly in half:
These halves will become the 'legs' of the pallet tray. 
The sides will be created by connecting one half to the other with 3 full sized sticks.  Start with the
 first stick lined up with the tops of the sides and then continue down.  I left a space at the bottom 
[mine was around a 2cm] so that the pallet tray was raised, but you could space your sticks further 
apart so that the bottom stick sits flush with the bottom.  Secure in place with plenty of glue:
[this is what they will look like from the inside]
...and repeat with the other lollipop stick halves, creating your four pallet tray sides:
 [this is what they will look like from the outside]
Next, take two of your pallet tray sides and attach a lollipop stick along the bottom of each:
 ...hold the lollipop stick in place as it dries to ensure that it sits neatly in place at a 90 degree angle against the side.

Next, we can begin gluing the sides together.  Taking one of the sides that you didn't add an additional lollipop stick to, glue this in place to one of the sides that you did, insides facing.  It should fit neatly above the additional lollipop stick and you can reinforce the join with more glue on the inside:
[I hope that made sense!] 
Repeat this with the other two sides and then finally, join both sets together, holding in place
 as the glue dries and adding additional glue to reinforce the joins if required [this is also useful
 if any sides don't quite fit together and the glue will fill that gap]:
Finally, with the remaining 4 lollipop sticks, I placed these [sort of] evenly across the 
remainder of the bottom of the pallet, fixing in place with my hot glue gun and adding extra 
from the iside to reinforce:
[if you want to reinforce the strength of the bottom, repeat this stage with lollipop sticks in the 
opposite direction, adding more glue at the ends and also where the lollipop sticks cross]
  ...and your pallet tray is complete.
[you can paint and decorate your tray to fit in with your style and decor]
Use your pallet tray for display or as a storage:
[it was surprisingly strong!] 
...or create a smaller version for chocolate [much better idea]:
[made in exactly the same way, just using standard sized lollipop sticks]
see you next time x

More Easter DIYs here.