Laman

Sunday, August 30, 2015

Coffee Macarons

Picture me, head in hands asking why-oh-why do I do this to myself...
Macarons. They tease me, tempt me, and ultimately taunt me.
But I keep on coming back to them!
It's been a while since I made these little devils delights. But one batch, and I'm hooked again...
So, here's a pairing of two of my addictions: coffee and macarons!


Coffee Macarons 

3 egg whites (100g-110g), at room temp. Aged for 2-3 days.
2 tbs caster sugar
1/2 tsp cream of tartar
200g icing sugar
125g ground almonds/ almond meal
1tbs instant coffee granules (use good quality freeze dried coffee), dissolved in 20ml boiling water. 

Prepare baking trays with parchment. Make sure that the parchment is flat and that the trays aren't warped.

Put the almond meal and icing sugar into a food processor and pulse until well mixed and finely ground.  Sift into a bowl. Discard the large granules which don't pass through the sieve.

Whisk the egg whites at low speed with an electric beater until frothy, then add the cream of tartar. 
Beat until soft peaks form, then add the caster sugar, slowly down the side of the bowl.  
Beat at high speed just until stiff peaks form. Add the cooled coffee mixture. Fold it in. 

Sift half the almond meal / icing sugar mix into the meringue and fold in.   
Then sift in the remaining almond meal and icing sugar. Once again discard any large granules of almond meal.

Use a spatula and a figure-of-8 motion to gently fold the batter until it is loosened and falls in "ribbons" from the spatula.
(This is a tricky part - as you need to avoid both under-mixing, and over-mixing!)  

Transfer to an icing bag with the tip cut off or one fitted with a large plain round icing nozzle (not more than 1cm diameter).

Pipe small dots of batter beneath the corners of the baking parchment  to keep it in place on the baking tray.

Pipe your macaron rounds - about 3-4cm diameter, about 2cm apart. Pull your piping tip to the side - this leaves a tiny tail, which will settle. 
Rap the tray twice on the counter to release air bubbles. 

Now, turn on your oven to 150'C

Leave the macarons to stand for approx. 30minutes until they form a "skin" - ie. when touched with a clean, dry finger they aren't sticky.

Bake at 150'C for 15-16 minutes.
Check that they're not browning as the end of the baking time approaches.

Leave to cool for 5minutes, then remove from the trays. If they are undercooked, they will stick to the parchment. You can pop them back into the warm oven for a few more minutes just to dry out a little more.
(Macarons are best after being filled and left for 24hrs - the filling rehydrates them a bit.) 


Dark chocolate ganache

200g dark chocolate, cut into small, even sized pieces.
100ml cream ( 35-40% fat content) 

Place both ingredients into a double boiler (a heatproof bowl placed over a pot of simmering water) 
Heat slowly, stirring frequently until all the chocolate has melted. (Alternatively microwave, in 30second bursts. Stir in between. Do not overheat!) 

Leave to cool down at room temperature. Place some cling-wrap onto the surface of the ganache to prevent a crust forming. 

Allow the ganache to set to spreading consistency, then either spoon or pipe it onto a macaron shell. Place another matching-sized macaron shell on top.

Store the macarons in the fridge, but allow them to come to room temperature before serving.


Enjoy!

xxM 

Friday, August 28, 2015

Pastel Lezat


Pastel, makanan yang satu ini merupakan jajanan favorit yang hampir tidak pernah ditinggalkan oleh banyak buntik-buntik (bunda cantik, red) setiap ada acara ngumpul bareng di rumah. Pastel merupakan hasil kreasi kuliner yang telah dikenal oleh banyak penggemar kuliner dan pencipta kuliner itu sendiri, selain mudah untuk buat tentu saja karena alasan banyak orang yang menyukai jajanan yang satu ini.
Adapun jenis pastel itu sendiri banyak, ada pastel pakai telur ada pastel, tidak pakai telur serta adapula pastel mini.


Resep Pastel Tanpa Telur
Bahan kuit:
Bahan kulit A:
Tepung terigu protein rendah                   250 gr
Air                                                            170 cc
Garam halus                                             1/2 sdt

Bahan kulit B:
Tepung tergu protein rendah                    225 gr
Mentega putih                                             75 gr
Margarin                                                     75 gr

Cara membuat kulit:
    • Campur bahan B sampai
    • Campur bahan A uleni hingga kalis, diamkan 10 menit. Lalu adonan dibagi menjdi 30 bagian, bulatkan.
    • Giling adonan kulit A, masukkan adonan kulit B, bulatkan kembali. Giling adonan ini, gulung, dibalik lalu digiling lagi dan dibagi 2  Resep by Ala Dapur Bunda
    Lebih jelasnya bisa tonton video ini https://youtu.be/sAdzCXj6doI selamat mencoba dan terimakasih telah mengunjungi blog kami. 

    Pastel Gurih dan Lezat Pakai Telur Ala Dapur Bunda
    Bahan:
    Terigu serba guna     1000 gr
    Garam                            7 gr
    Kaldu instant bubuk       5 gr
    Telur                             50 gr
    Margarin                     100 gr
    Air                              450 gr

    Cara membuat:
    1. Aduk semua bahan kering hingga semua bahan ampur rata, masukkan dan air hingga agak menggumpal.
    2. Tambahkan margarin dan sisa air hingga  adonan 3/4 kalis.
    3. Istirahatkan adonan selama 10 menit.
    4. Giling dan tipiskan adonan hingga ketebalan 1,5 mm.
    5. Potong-potong adonan, diameter 10 cm.
    6. Isi dengan bahan isian dan pilin bagian tepinya.
    7. Goreng pastel dengan sedang hingga berwarna kuning keemasan.Resep by Ala Dapur Bunda


    Pastel Beff Black Pepper
     

    Isi:
    Keju Parut                                 150 gr
    Daging sapi iris tipis                 250 gr
    Wortel rebus (bentuk dadu )     200 gr
    Macaroni rebus                         200 gr
    Telur                                            1 btr
    Garam                                         1 sdt
    Gula pasir                                   3 sdm
    Lada hitam ditumbuk kasar     11/2 sdt

    Bumbu:
    Bawang bombay cincang        100 gr
    Bawang putih cincang           1 siung
    Garam                                    1 sdt

    Cara membuat:
    1. Tumis bumbu hingga harum, masukkan daging, masak hingga matang, masukkan wortel, macaroni, garam, gula, lada hitam, keju parut, aduk hingga rata.
    2. Ambil satu buah kulit, tipiskan cetak, masukkan 1 sendok isi dan satu potong telur oles putih telur, katubkan dan pilin bagian tepinya.
    3. Goreng dengan api sedang sampai kuning kecoklatan.Resep by Ala Dapur Bunda


    Pastel Chiken Ori

    Isi:
    Keju parut                        150 gr
    Ayam rebus                      250 gr( dipotong dadu)
    Wortel rebus                     250 gr
    Soun rebus                       125 gr
    Kacang polong rebus         50 gr
    Telur rebus                          1 butir
    Garam                                 2 sdt
    Gula pasir                           3 sdm

    Bumbu yang dihaluskan:
    Bawang merah                   75 gr
    Bawang putih                     30 gr
    Garam                               1/2 sdt

    Caranya :
    1. Tumis bumbu halus hingga harum, masukkan ayam, masak hingga matang, masukkan wortel, kacang polong, soun, garam, gula, keju parut lalu aduk hingga rata.
    2. Ambil satu buah kulit tipiskan, cetak masukkan isi 1 smk dan 1 potong telur, lalu oles kulit dengan putih telur, katubkan pilin tepi kulit.
    3. Goreng pastel dengan api sedang sampai kuning kecoklatan. Terima kasih atas kunjungan anda di blog kami. Selamat mencoba semoga bermanfaat. Resep by Ala Dapur Bunda


    Sunday, August 23, 2015

    Queen of Hearts Cookie Tutorial

    The hardest thing about the "Mad-Hatter's Tea Party" themed class was limiting the number of cookies we decorated.  The story of Alice in Wonderland is a feast for the imagination, and the movie versions (I'm partial to Tim Burtons, but enjoy Disney's too!) are full of amazing imagery.  So, there are so many (too many!) great Wonderland cookie ideas to choose from. 


    One of the ideas I love, is using a heart cookie for the Red Queen's face. It's just so appropriate and so clever - with her being the Queen of Hearts!
     I'm not sure who did it first - I've seen versions by Ali Bee's Bake Shop, Sugarbelle, Sprinkle Bakes and several more. Well done to whoever thought of it: brilliant! 


    Here's my version: 


    Here's how:          Outline where her face will go. 


    Flood the area with white "15 second" icing (flooding consistency royal icing)


    While the white background is still wet, add two blue (eye-shadow) ovals. Allow to dry. 

    Once the face has dried, pipe on eyelids, eyebrows, and lips (a little heart of course!)   


    Use a small open star nozzle (Ateco 14) to pipe on red rosettes of hair. This needs to be stiff-peak icing. Fill any gaps between rosettes with a single floret of icing 

    Keep going...

    Allow to dry completely 


    "Imagination is the only weapon in the war against reality"
    Happy decorating!

    xxM

    Wednesday, August 19, 2015

    Review | Jewellery Maker Gemstone Bracelet

    Hello! 
    Todays post is a collaboration with Jewellery Maker and has been the perfect DIY as my craft stash remains in boxes whilst I [try to] move.


    If you've been reading this blog for a while, you'll know that I have made some attempts at jewellery.  I'm particularly interested in making my own bracelets and you should never leave me in the bead aisle of a craft store unattended.  I am still at a very early stage of learning this craft and very keen to develop it.

    When I was contacted by Jewellery Maker to try one of their kits, it was too good an opportunity to miss and I had lots of options to choose from.  Whether a beginner or more experienced in jewellery making, there is something for all tastes.  
    I chose the Mixed Gemstone Bracelet, which retails at £14.95:
     So, what do you get?  All of the materials you require are in the box.  You need to provide the tools, which in this case, I could find my round nosed pliers and found that that was enough for this kit.  If you are interested in starting jewellery making, I can recommend the HobbyCraft own brand tools as an inexpensive place to start.  Furthermore, if you are brand new to the craft, there's a great set of video introductions on the Jewellery Maker site.
    The kit itself is neat and compact:
    The bangle bracelet is large and consists of looped sterling silver, so the designs you can create are endless.  But you're not left to create the bracelet alone.  A photo step-by-step guide to making your jewellery is also included for reference and to keep you on track:
    After checking my contents, I decided on an ombre effect with the white and purple-toned gemstones:
    ...and creating the bracelet is simple.  Firstly, open the finding with pliers:
    ...hook on your gemstone:
    ...and then close over the bangle:
    Continue this process, building up the charms:
    I sat happily with my cup of coffee and the Bake Off, repeating the process and going in to a
     crafting trance as I did so.  The. Best.  Finally, all my charms were added:
    I'm really pleased with the final outcome - it's subtle [just as I like], but with detail and interest.  As I add to the bangle, I'll move the charms to the double loop, but I like the way the charms fall with the simple design on the single loop for now.

    The only problem I came across during the process was that a few of the gemstone charm attachments were too small to fit on to the findings:
    ....there were a couple of casualties when I tried to widen the loop myself to make them fit.

    My next plans are to make my own charms to add to it - if you have some of your own, these are easily added to the bracelet - there are endless ways in which you could personalise and vary the design:


    So, if you're thinking of trying out a kit yourself, it's my favourite time - discount time! 
    Jewellery Maker have offered an exclusive discount to the blog:
    Simply use the code 'SheMakes' to receive a 15% discount on any purchase, if you fancy.

    ...and if you like what you seen, give Jewellery Maker a follow on Twitter, Facebook and Instagram for tips, behind the scenes photos and for a gallery of ideas and other peoples makes.

    If you do have a go at any kits, let me know - i'd love to see the results!  
    I've got my eye on the stamping kit.....
    ...but meanwhile, there's a wealth of knowledge and some fab video tutorials on their website 
    that I need to make my way through for my next jewellery-making attempts!

    see you next time x

    Disclosure: I was contacted by Jewellery Maker to review a kit, which was sent to me.  I was not paid for this post and all opinions are my own.  Many thanks for your support!

    Sunday, August 16, 2015

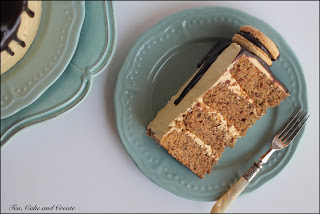
    Coffee and Walnut Cake

    This was not the cake I'd planned to make for my sister's birthday. I had something prettily decorated  in mind instead; some flowers, some lace. 
    But time ran away from me. So I baked something simpler instead. 
    Ha ha! 
    Like it's simple for me to whip up a batch of macarons. Sure! 
    But I suddenly got a bee in my bonnet about decorating this coffee and walnut cake with coffee macarons (darn bees! darn bonnets! darn macarons!). And with a bowl of aged egg whites sitting in the fridge, I couldn't find an excuse not to give them a bash.  (Macarons and I have relationship issues.) 
    Anyway, they turned out ok. And as always, even if they don't look perfect, macarons taste great. 
    So did the rest of the cake, actually!


    Coffee and Walnut Cake
    Recipe by Tea, Cake and Create

    Preheat the oven to 180'C
    Grease and line 3x 8inch cake pans
    (I used 4 x 7 inch cake pans, because I prefer slightly taller, smaller diameter cakes)

    360g cake flour
    400g caster sugar
    1 1/2 tsp baking powder
    1 1/2 tsp baking soda
    1/2 tsp salt 4 large eggs + 2 egg yolks
    220g butter, cut into cubes, at room temp.
    300ml buttermilk
    10ml instant coffee granules, dissolved in 15ml boiling water (use good quality, freeze dried coffee granules)
    2 tsp vanilla extract
    175g walnuts, finely chopped


    Sift the dry ingredients (including the sugar) into the bowl of an electric mixer. Use the paddle attachment on low speed to mix the ingredients together.

    Add the butter to the mixer, and beat on low speed until the mixture resembles breadcrumbs.
    Mix in 250ml of the buttermilk.
    Increase to medium speed and beat for 1 - 2 minutes, until light and fluffy.
    While this is mixing, in another bowl, whisk the eggs, yolks, and remainder of the buttermilk together.
    Add this to the beater in 3 batches, scraping down the sides of the bowl in between additions.
    Mix in the dissolved coffee and vanilla.
    Beat until just incorporated.
    Fold in the walnuts.

    Divide the batter equally between the 3 cake pans.

    Bake at 180'C for approximately 30 - 35min, or until a cake tester inserted comes out clean.

    Allow the cake layers to cool in the tins for 10 minutes before turning out onto a cooling rack.


     Coffee Swiss Meringue Buttercream

    200g caster sugar
    5 egg whites
    250-300g butter, at room temp cut into cubes
    1 tsp vanilla extract
    15ml instant coffee granules (freeze dried ) dissolved in 20ml boiling water.

    Dissolve coffee granules in boiling water. Allow to cool.

    Put the egg whites and sugar into a mixing bowl, and place that over a suitable saucepan of simmering water. 
    The bottom of the mixing bowl must not be in contact with the water.

    Whisk constantly, until the sugar granules have dissolved and the mixture is hot to touch. 

    Move off the stove, and to the mixer.
    Using the whisk attachment, whip until it forms a thick and glossy meringue.

    When the mixing bowl feels neutral to touch, change over to the paddle attachment, and add the butter one cube at a time, beating on low-medium speed. Keep adding butter until it reaches a pipe-able consistency. 
    (It may curdle, but just keep whipping until it reaches a satiny smooth consistency and holds its shape.)
     Add the vanilla extract and coffee; beat well to incorporate. 


    Spread between the cooled cake layers, and over the surface of the cake. 


    To complete the cake as pictured, pour chocolate ganache over the top of the cake and allow it to dribble down the sides . 
    And despite my shaky relationship with macarons, I'll be posting the recipe for these coffee flavoured ones soon. 


    Happy baking!

    xxM 

    Tuesday, August 11, 2015

    Braided Nutella Bread

    So, I may become a little theme-obsessed.
    Ok, I freely admit it. I do. I do!

    For my son's recent Penguins of Madagascar party, it was all about black, white and orange ... and so of course I had to carry that through from the decor to the food. (With the minor concession of dark chocolate substituting for black... I'm ok with that.)

    The kids' table had Flings (in lieu of "Cheezy Dibbles" - Penguins' favourite snack, apparently); orange wedges;  liquorice; home-made white marshmallows and popcorn. (And the other baked treats that I posted on Facebook.)

    I had a bunch of ideas for the adults' table, but had to restrain myself to just a few, and made dark chocolate tarts, cookies and cream cheesecake with Oreo truffles and a braided Nutella bread.


    So, I'm working on putting the cheesecake recipe together for you, but for now here's the link for the braided nutella bread.
    As always, when working with a yeast dough you have to have the patience of two provings.
    But (as always) it's worth it!


    Happy baking!
    xxM

    Wednesday, August 5, 2015

    I Want To Live Beautifully.

    Post holiday blues aren't really something I tend to suffer from, but after my Paris trip I couldn't help feeling a bit differently about life. Not in a bad way as such, but my brain has been whirring and pondering ever since. Sitting outside a cute Japanese bakery in the heart of Paris wearing a food themed lolita dress, and savouring a rich blueberry cheesecake was truly a moment of pure bliss for me, and I realised that I don't have those moments nearly often enough.

    In my early lolita days, reading lolita lifestyle blogs was perhaps my favourite pass time. I completely immersed myself in these romantic writings, soaking up each tip to guarantee me a life of beauty and elegance that I could also represent through my mode of dress... or so I thought. 

    Lately, I've been going through a bad emotional slump. So many aspects of my life aren't where I want them to be, and constant disappointments have rendered me feeling a lot less positive about 2015 as we work our way through the second half of the year.

    I let my passions and interests begin to fall by the wayside as I tried to tackle a whole host of new responsibilities and challenges. In life, there's always going to be dark times and stress and unpleasantries... but it's even harder to deal with them when you're not making a special effort to ensure your free time balances out the negativity and enriches your soul. One thing that's been encouraging me to revisit these romantic notions is the small but certain online stirrings of a lifestyle lolita revival. I want to now, more than ever, celebrate femininity and softness and the picturesque-- qualities I always appreciated but felt I couldn't truly express until I got into lolita, which transformed my way of seeing the world. I want to live beautifully, as often as I can.

    I'm one of those overly nostalgic people who likes to take the things I enjoy and hold onto them, even if the world around me continues to change. I feel a little uncomfortable with this decade, due to the fact it seems to be killing off the very notion of subculture, and watering it down so that it becomes nothing more than a tumblr reblog away from being the subject of yet another mainstream clickbait article. With the increasing popularity of the lolita, I suppose it's no wonder some of us are developing a "get off my lawn" mentality as we see the aspects of the subculture that meant the most to us being replaced with a superficial, OTT costuming mindset. I think we miss that old livejournal, longform blogging atmosphere, which actively encouraged us to to not only wear lolita, but to be lolita-- to wear the fashion because it allowed us to express ourselves and extend or carve out our own complementary way of life, as members of other subcultures like goth or steampunk might do. 

    A few weeks ago, I spent the day with my friends, having afternoon tea on board a floating tea room. This day could not have come at a better time for me, as I was desperate for a nice day out where I might be able to forget the greyness day to day life can bring, and enjoy the company of like-minded people. I don't think my friends have anywhere near the same sort of lifestyler view of lolita as I do, but us all joining egl around the same era means we have a lot in common, and enjoying meeting up for a peaceful meal in lolita is no exception.

    The weather was truly glorious that day, and beyond the little windows of the barge, we could see the waves of the River Thames rippling as the boat swayed so gently it was impossible for us to feel it ourselves.

    We were able to adapt the afternoon tea to suit our own tastes, which meant we got to maintain the elegant set up, but with the food and drink we personally liked best. Being a hot day, I opted not for a traditional cup of loose leaf tea, but instead sampled their elderflower cordial. It was light and refreshing, perfect for the summer heat. I deviated yet again, this time from the traditional sandwiches, and opted for a bacon one instead. This ended up being so filling I was sadly only able to devour half of my fruit scone and jam. I had a lovely time, and can't wait to try out other places which serve afternoon tea.

    One of my rarely mentioned passions in life is interior design. I could (and do) watch property programmes, tours of people's homes, and DIY homeware tutorials on YouTube for hours. I currently only have a small bedroom to deck out as I please, but I still have a couple of pieces which convey the theme I'm hoping to have running through my future home.

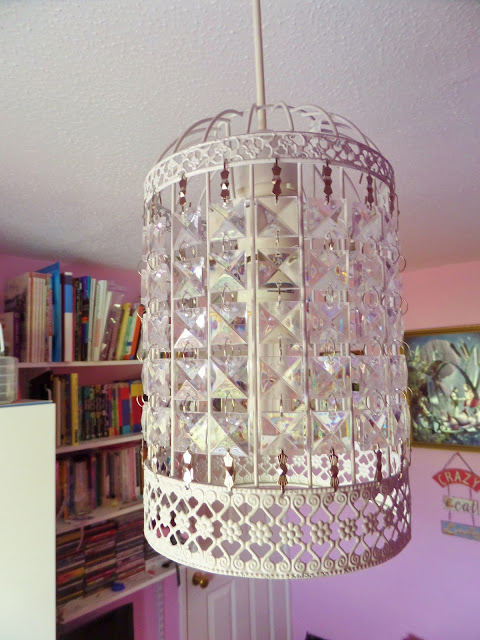
    It's an easy one to forget, but light fittings can create such an elegant focal point in a room. I did not realise this until I was gifted this one, which makes me think of an opulent bird cage. 

    This difficult-to-photograph framed painting is so special to me. It used to hang in the family living room, and naturally it reminds me of my childhood. I always loved fairy imagery, so the scene depicted here enchanted me, especially due to the the glittery, shimmery, highly textured paper. I've never seen anything quite like it before, and I have no idea who the artist is or where it came from. I wouldn't be at all surprised if it turned out to be a portal to a magical realm.

    A bed takes up a significant surface area in a room, so dressing it up in a nice throw can really help to create a wonderful aesthetic. A lot of lolitas seem to own this Primark patchwork print throw that I'm using at the moment, and I'm not surprised as its so soft and cottagey. Its delicate florals are not overwhelmingly cutesy, which suits me well.

    A decor blog I find particularly inspiring is Fairy Nests, which is filled with images of homes which have a balance of cuteness, elegance, and historical influence that really appeals to me. There is something so inherently lolita to me about these overtly feminine homes, and I think that by simply changing up the colours and accessories, you could easily come up with the perfect aesthetic for sweet, classic, or gothic lolita dwellings.

    I find that even the mundane can evoke positive feelings. Today, I had to go to the post office to send out an order from my online shop. When I woke up in the morning, it was rainy and dreary outside, and didn't exactly make me feel excited about my excursion. But rather than let pessimism take over, I showered and dressed in a simple old school inspired coordinate. By the time I was ready to leave, the rain had stopped and the sun had come out. Newly energised, I decided to take some pictures.

    I'm not sure what this pose is all about, but either way, it was a lot more fun organising my own awkward photoshoot on the landing in front of my bedroom door, rather than taking a rushed, blurry mirror picture like I usually do. 

    Simply putting on even a basic lolita coordinate for a brief venture outdoors never fails to brighten my mood. It's fun, it's freeing, it's ever so slightly rebellious, and it makes me appreciate how lucky I am to live in a town where I can express myself in this way without fear.

    Honestly, I cannot imagine only wearing lolita a few times a year for special events. But I am glad that I can take comfort in knowing that if it had to come to that, I could still find fun little lolita-esque treats to indulge in, which for me include things like burning delicately scented candles, listening to my favourite music, reading new lolita blog posts, or keeping up with threads where I continue to be inspired by others trying to evoke the noughties egl lifetstyler sensibilities again.

    A lolita lifestyle can be anything a lolita wants it to be. The aim for mine is to make my life as beautiful as it can be. As our exceedingly bizarre friend Novala Takemoto would say:

    Sew frills onto the hem of your heart! 
    Put a tiara on top of your soul! 
    Have pride.