Laman

Monday, October 26, 2015

DIY Decor // How To Make Autumn Pumpkin Favours

 These little felt pumpkins are not only easy and simple to make, they are a quick craft 
that can be used as a table favour, decoration or gift bag for trick-or-treat visitors.


These are also cheap to create- using just half a sheet of A4 felt and a little thread
- perfect for using up scraps or keeping costs low:
I used the bottom of a mug tree as my template [another DIY coming soon] that 
measured around 14cm in diameter - trace this onto your felt and cut your circle 
[don't worry too much about the curve of your cut - it doesn't need to be perfect]:
Next, take a needle and thread and create a running stitch around the circumference of 
your felt circle, with about 1cm hem.  [You could also use embroidery thread or thin ribbon].
Don't tie a knot at either end, but ensure that you have plenty of thread at the start and finish 
of the stitching to use as ties - bring the stitching to meet, unthread your needle and then pull 
the thread at either end to bring the felt circle together and create a small drawstring pouch:
Fill your pouch with treats - my weapon of choice were chocolate pumpkins.
For a final touch - and before tying the pouch closed completely - I created stalks with 
some dried  twigs from the garden - just trim them to size and place them in the centre: 
Pull and tie your strings to close the pumpkin fully to create pretty little gift favours bags.  
You can create an array of different colours and add further detail with stitching if you'd like:
 These are perfect Autumn displays and alternative Halloween treat gift bags [just add some faces].
see you next time x 

Sunday, October 25, 2015

Golden Cookies

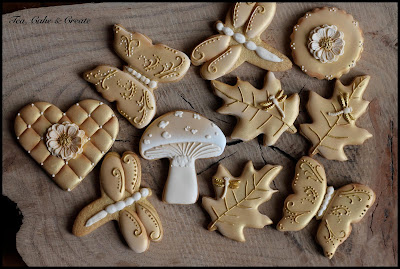
And now from black and white to gold... (Maybe I should have made them green and gold, but let's not talk about the rugby! Ugh!)
It's another batch of cookies with a simple colour scheme.
I'm getting too used to this - only having one or two colours of icing to prepare... Will I get away with just red and white for Christmas cookies, do you think...?!


I flooded all of these cookies with ivory coloured royal icing, then airbrushed on the gold sheen once the icing was dry.
All the details, and the bodies of the dragonflies and butterflies were piped on after airbrushing.
But while the bodies and those dots were left un-gilded; once they were dry, I  hand-painted gold sheen onto the swirls and dots on the insects wings, and the veins on the leaves.
Why not just airbrush those, too? Because, although you can't see it well in the picture, it's a richer gold than the background colour.

 The tiny dragonflies and flowers were created with moulds, using ivory coloured CMC/ tylose paste  and the gold accents painted onto those.

I also added some brown dusting to create shadows and antiquing.
Simple colours, but many steps as it turns out!


If you don't have an airbrush, you can still get a gold sheen on your cookies - use a nice soft blusher brush (purchased specifically for decorating cakes and cookies, not the one from your make-up drawer!) and gold lustre dust powder. Just dust it onto your cookies once the icing has dried completely: Gorgeously golden cookies!

Happy decorating!

xxM

Saturday, October 24, 2015

CAKWE

                                            
cakwe


Bahan:
Terigu                     1000 gr
Baking powder             5 gr
Garam                         25 gr
Gula pasir                   25 gr
Kaldu ayam                  8 gr
Putih telur                    2 btr
Air                            500 ml
Amonium bicarbonate  5 gr
Bawang putih cincan 10 gr
Ragi                             1 gr

Cara membuat:
  1. Aduk semua bahan kering
  2. Larutkan amonium bicarbonate ke dalam air, lalu tuangkan 1/3 bagian ke dalam bahan - bahan kering. Tambahkan telur
  3. Tambahkan sisa air sedikit demi sedikit sambil terus diaduk sampai menjadi adonan yang kalis
  4. Istirahatkan adonan selama 2 jam
  5. Adonan dipipihkan dengan ketebalan 0,5 cm dengan lebar 10 cm, dipotong 1,5 cm dan ditumpuk 2 lapisan
  6. Goreng adonan cakwe dengan minyak yang panas
  7. Cakwe siap disajikan. Resep by Ala Dapur Bunda

MARTABAK MANIS

martabak manis

Bahan:
Terigu serbaguna       1000 gr
Baking soda                   14 gr
Garam                             5 gr
Gula pasir                   140 gr
Telur                               2 btr
Air                            1400 ml
Vanili                              1 gr
Susu bubuk                  20 gr

Filling:
Keju Cheddar             250 gr
Cokelat meses            250 gr
Margarine (untuk polesan) 250 gr
Susu kental manis secukupnya
 
Cara membuat:


  • Campurkan bahan kering, aduk sampai rata ( diaduk pakai hand mxer atau kocokan telur )
  • Masukkan air dan telur, aduk sampai keluar gelembung udara ( 15 mnt )
  • Diamkan 15 mnt
  • Tuang ke loyang panggang hingga matang  Resep by Ala Dapur Bunda   

Thursday, October 22, 2015

ACCESORIES PERNIKAHAN


WEDDING NECKLACE 1
Harga : Rp 70.000,- ( dan packaging )
diameter : 28,5cm , rantai dan otomatis tanpa penutup
Bahan : rantai gold , kristal ceko , mutiara sintetis , eyepin , ring

WEDDING NECKLACE 2
Harga : Rp 50.000,- ( dan packaging )
panjang : 52cm , toogle clasp dan eyepin
Bahan : mutiara sintetis 2warna , eyepin , ring , toogle clasp , pembatas kalung bunga pink besi


WEDDING NECKLACE 3
Harga : Rp 60.000,- ( dan packaging )
panjang : 51,5cm , senar dan toogle clasp besi
Bahan : senar , kristal ceko , mutiara sintetis , chalote , ring , toogle clasp besi , mawar clay

WEDDING NECKLACE 4
Harga : Rp 45.000,- ( dan packaging )
panjang : 51,5cm , senar dan toogle clasp
Bahan : senar , kristal ceko , mutiara sintetis , eyepin , ring , bola mata intan imitasi , toogle clasp


WEDDING NECKLACE 5
Harga : Rp 75.000,- ( dan packaging )
panjang : 41,7cm , senar dan toogle clasp besi
Bahan : senar  , mutiara sintetis , chalote , ring , toogle clasp besi , bola mata intan imitasi ,
             liontin bunga besi pink

WEDDING NECKLACE 6
Harga : Rp 45.000,- ( dan packaging )
panjang : 52,5cm , lobster dan eyepin
Bahan :  kristal ceko , mutiara sintetis , eyepin , ring  , lobster , mawar clay


WEDDING NECKLACE 7
Harga : Rp 40.000,- ( dan packaging )
panjang : 55,5cm , lobster dan rantai
Bahan : rantai  , mutiara sintetis  , ring , obster , liontin love , charm burung gold


WEDDING NECKLACE 8
Harga : Rp 38.000,- ( dan packaging )
panjang : 51,5cm , lobster dan rantai
Bahan :  mutiara sintetis  , ring , sekat , liontin mutiara sintetis

WEDDING NECKLACE9
Harga : Rp 36.000,- ( dan packaging )
panjang : 45,2cm , lobster dan rantai
Bahan :   mutiara sintetis  , ring , liontin besi


WEDDING NECKLACE 10
Harga : Rp 43.000,- ( dan packaging )
panjang : 47,5cm , lobster dan rantai
Bahan : batu peacah , liontin love


WEDDING EARING 1
Harga : Rp 7.000,- ( dan packaging )
panjang : 5cm
Bahan : mutiara sintetis , sekat mata , rantai

WEDDING EARING 2
Harga : Rp 13.000,- ( dan packaging )
panjang : 6,5cm
Bahan : mutiara sintetis , kristal ceko , ring , prabu , senar , eyepin

Sunday, October 18, 2015

Black and White Cookies

When I scheduled this theme - Black and White Cookies - I had a very clear idea of what I was going to do, but the months between the scheduling and the doing had clouded that inspiration, and when I was due to make the demo's, I found myself at a loss as to how to pull it all together. I'd promised stamping, stencilling, and brush embroidery techniques. In only two colours.
Yes, I know - looking at them now, it's clear that "Black and White Elegance" was the way to go, but I had a few stressful days there, all right?!


Here's a refresher on how to create a quilted effect on a cookie.
( I say refresher, because that was one of the earliest cookie tutorials I wrote on this blog, even before I had access to small, neat 00 icing tips. I cringe when I look at my amateur photography and early cookies; but if you insist on seeing it ... you'll find that post here!)


Quilted Cookie Tutorial:

Using an edible marker, or non-toxic graphite pencil, outline a grid of squares on the cookie. Pipe lines over the grid using an Ateco 00 or  PME 1.5 tip and soft-peak consistency royal icing 

Flood alternate square with flooding-consistency royal icing and allow to set (+/- 20min - depending on the ambient humidity). Once those squares have set, fill in the remaining squares.
Allow those squares to dry, then pipe dots of icing (soft-peak consistency) where the edges of the squares meet. Allow the cookie to dry completely overnight before packaging.


Happy decorating!

xxM 

Saturday, October 17, 2015

Puding Coklat Susu


Bahan:
1. Gula pasir             350gr
2. Agar-agar tawar        4 sachet
3. coklat bubuk            45 gr
4. Susu kental manis    1klg
5. Garam secukupnya

Berikut cara membuatnya

  •  Tuang gula pasir, agar-agar, susu kental manis ke  dalam panci aduk hinggaa rata. Saat mendidih masukkan coklat bubuknya secara berlahan dan aduk lagi agar tercampur hingga rata. Dengan api sedang setelah tercampur rata angkat dan matikan.
  •  Kemudian aduk-aduk adonan hingga tiada beruap lalu tuang ke dalam loyang atau cetakan sesuai dengan selera lalu angin-anginkan. Jika sudah dingin masukkan ke dalam lemari es agar mengeras dengan sempurna kemudian sajikan.Terima kasih atas kunjungan anda di blog kami . selamat mencoba semoga berhasil. Resep by Ala Dapur Bunda

GRAPE PUDDING

puding nata de coco
Bahan I:
Jus anggur siap pakai          500 ml
Air                                       300 ml
Agar agar bubuk                  1/2
Jeli instan bubuk                     6 gr
Gula pasir                            125 gr
Air jeruk lemon                    1/2 sdt
Nata de coco                        100 gr

Bahan  II:
Susu cair                              700 ml
Agar agar bubuk                   1/2
Jeli instan bubuk                     6 gr
Sirup leci                             100 ml
Jeli bubble                           100 gr

Bahan taburan:
Nata de coco cubes              100 gr
Jeli bubble                             50 gr

Caranya:
  • Bahan I: rebus jus anggur, air, agar agar, jeli instant dan gula pasir sampai mendidih. Angkat
  • Masukkan air jeruk lemon, aduk rata
  • Tuang selapis di gelas. Taburkan nata de coco, biarkan setengah beku
  • Bahan II: rebus susu cair, agar agar, jeli instan dan gula pasir sampai mendidih. Masukkan sirup leci. Aduk rata. Angkat, Tuang selapis di atas bahan I. Taburkan jeli bubble. Biarkan setengah beku
  • Panaskan bahan I, tuang selapis di atas bahan II. Taburkan nata de coco, biarkan setengah beku
  • Panaskan bahan II, tang di atas bahan I. Taburkan jeli bubble. Biarkan setengah beku. Lakukan hal yang sama sampai habis. Bekukan
  • Sajikan puding dengan bahan taburan. Selamat mencoba. Resep by Ala Dapur Bunda

Saturday, October 10, 2015

Daisy Cake

One of my greatest pleasures (and often challenges!)  in decorating, comes from choosing which colours to use together. 
Working it out is like a little bit of science, a little bit of art, and a little bit of magic!
  
   At the moment I'm enjoying using simple colour combinations  - bold ones like the black and white that we're using in an upcoming cookie class; orange and black (guess what October theme that's for!); and fresh ones like this combination of yellow and white.     
A very skilled cake artist that I know, once suggested that the addition of a bit of green often made the other colours on a cake "pop".
So, while not wanting to take anything away from the simplicity of the yellow and white, I thought some hints of green was good idea for this cake, to bring it to life.  What do you think? 


Daisies: 

Cut out the daisy from white CMC paste, use a leaf veiner to add detail

Place in a flower former to dry the petals slightly cupped


Dust the centre of the flowers with green dusting powder [this colour is Avocado from the Rolkem Rainbow Spectrum range] 


Use a little CMC glue to place the flower centres [these were made from yellow CMC paste, and cut with  Jem Cutters daisy centre stamps] Allow to dry completely before placing on the cake. [Use royal icing or melted white chocolate to insure they are securely stuck on]  


Yellow and white daisy cake...with a touch of green!


Happy decorating!

xxM